Deploy Proxmox Cluster with Integrated Proxmox Ceph Cluster
Environment
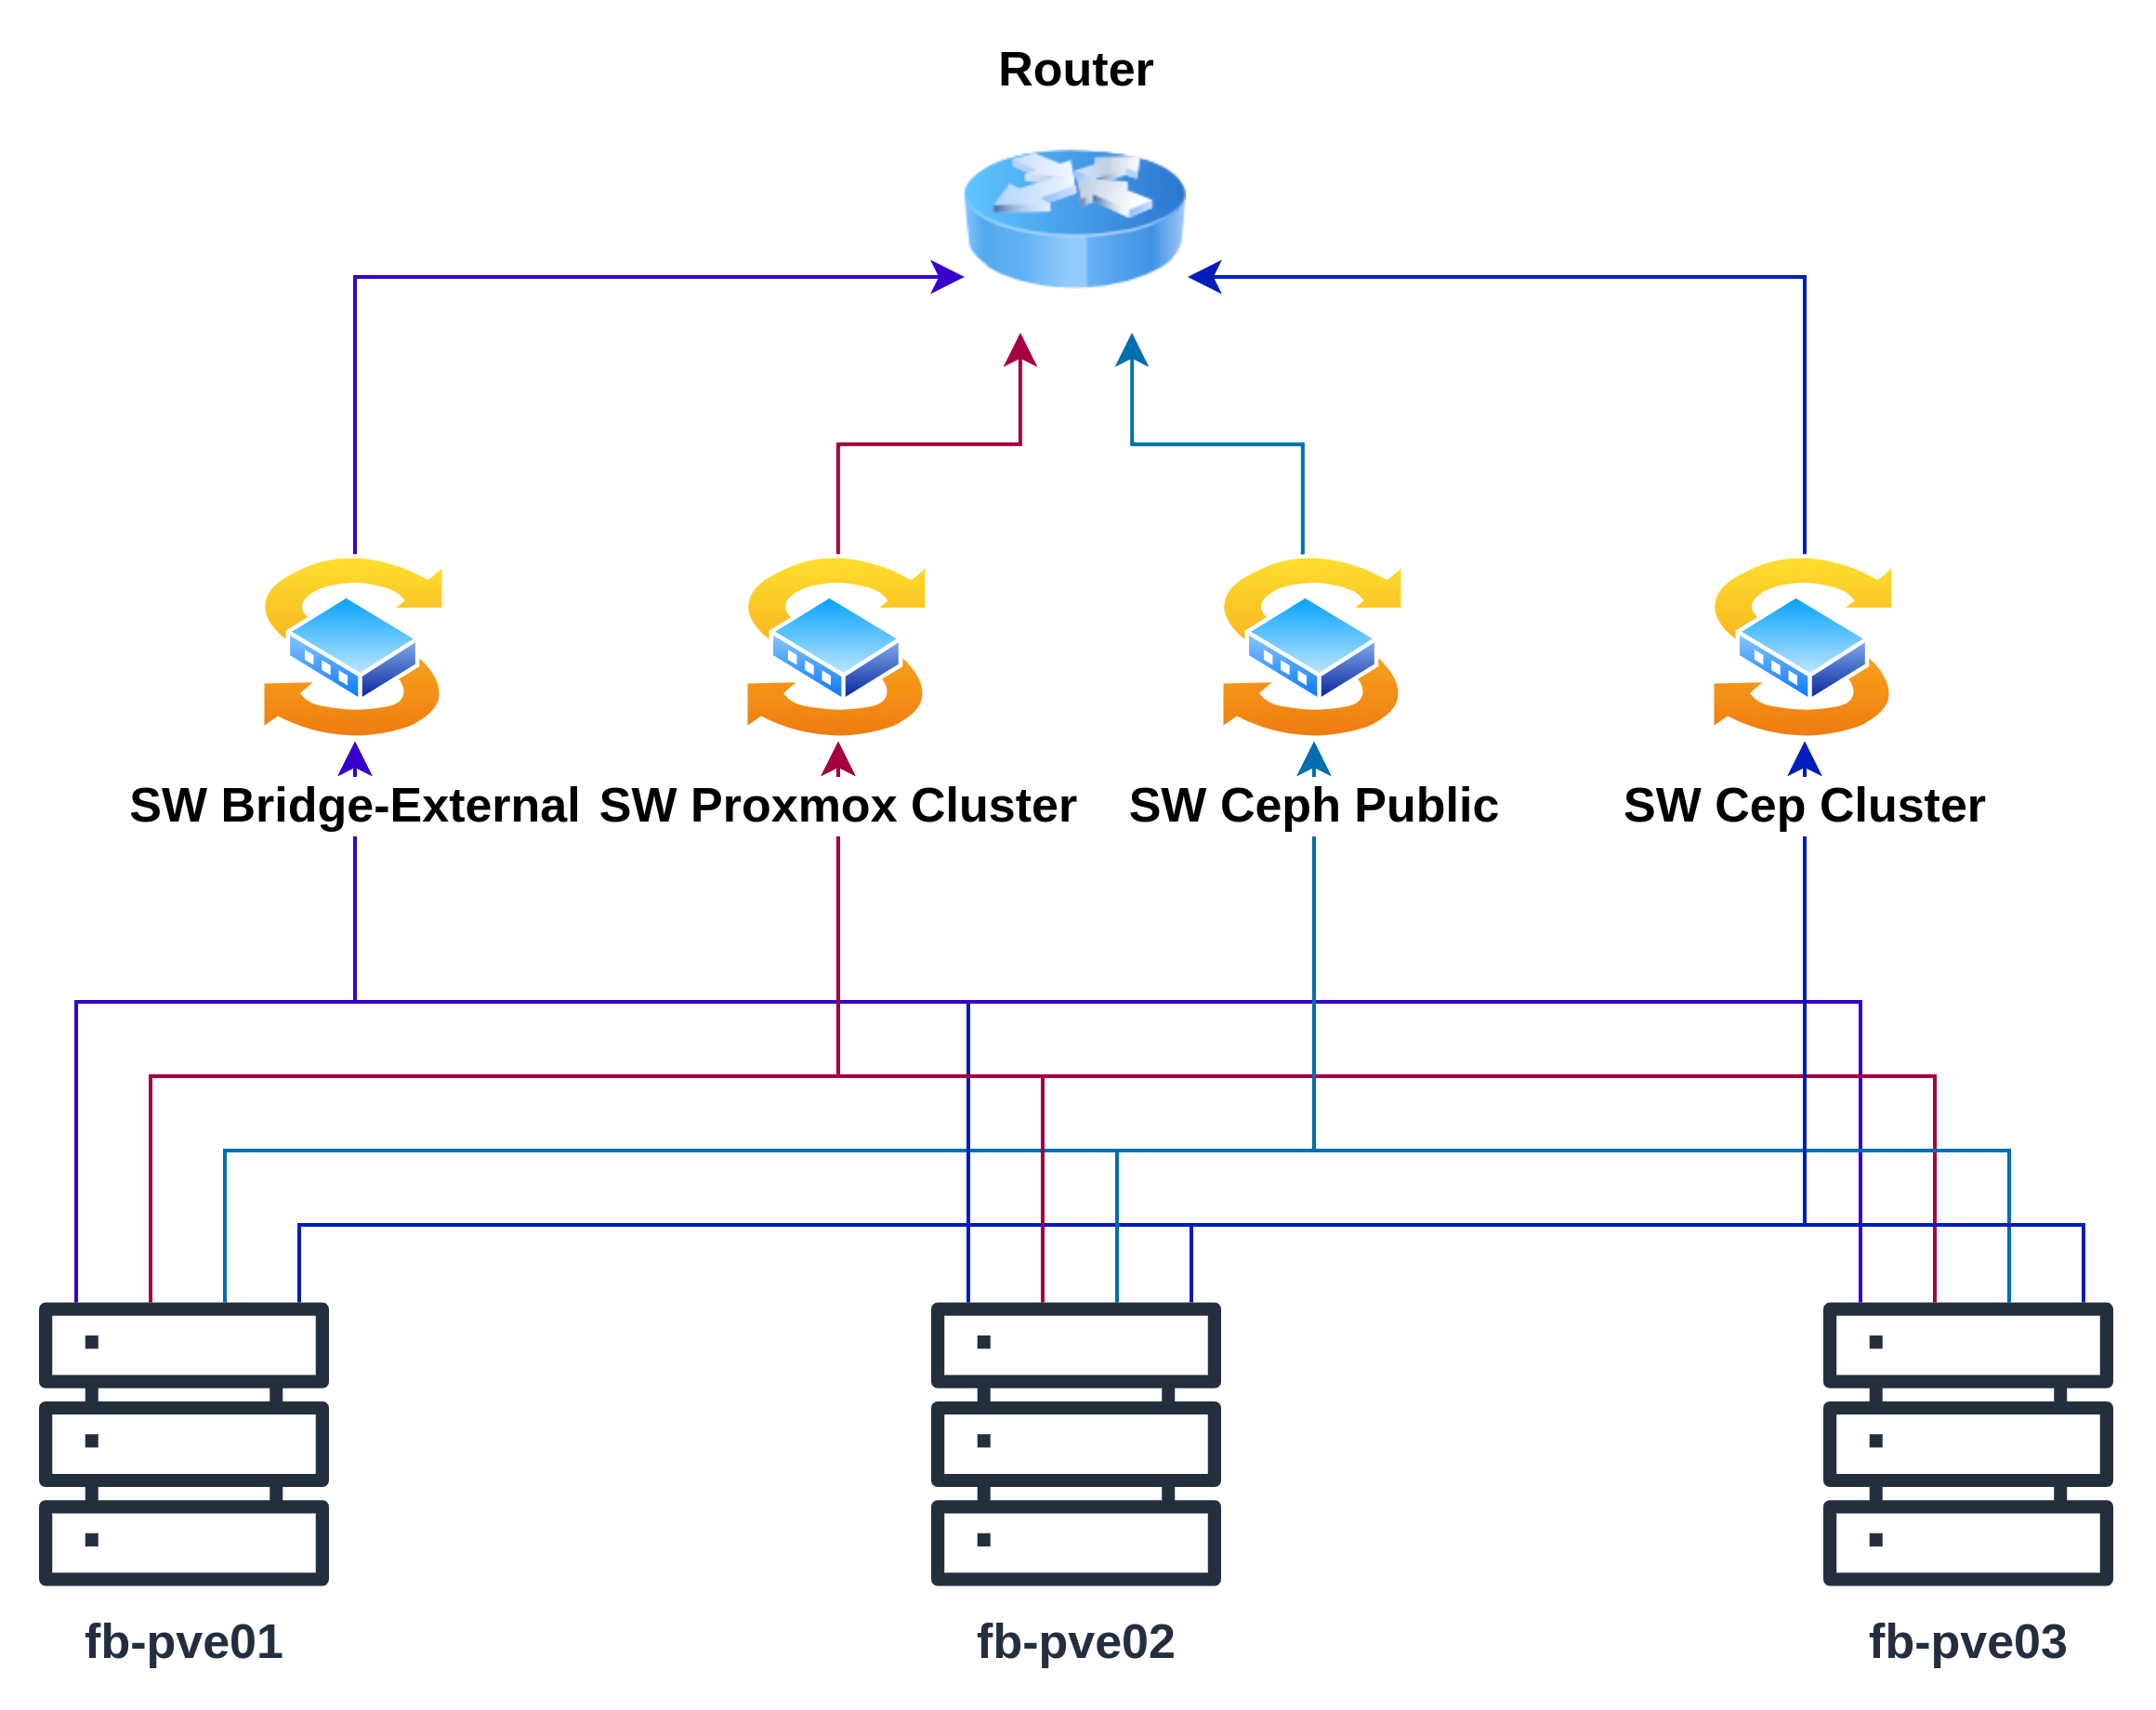
Diagram Architecture
Hardware Specification

Software Specification
| Software | Version |
|---|---|
| Operating System | Debian 11 |
| Proxmox | 7.4-13 |
| Ceph | Quincy 17.2 |
Preparation
Disable Managed hosts file from Cloud Init
This step is necessary if you use Debian cloud-image because if set true, /etc/hosts file will reset every reboot. Otherwise skip it.
1
2
3
4
nano /etc/cloud/cloud.cfg.d/01_debian_cloud.cfg

---
manage_etc_hosts: false
Update Root Password
1
2
3
passwd

#New password: Brawijaya302
Update Network
Change XXX to node’s last IP
1
2
3
4
5
6
7
8
9
10
11
12
13
14
15
16
17
18
19
20
21
22
23
24
25
26
27
28
29
30
31
32
33
34
35
36
37
nano /etc/network/interfaces.d/50-cloud-init
---
auto lo
iface lo inet loopback
auto ens3
allow-hotplug ens3
iface ens3 inet static
address 172.20.11.XXX/24
dns-nameservers 8.8.8.8
gateway 172.20.11.1
metric 100
auto ens4
allow-hotplug ens4
iface ens4 inet static
address 172.20.12.XXX/24
dns-nameservers 8.8.8.8
gateway 172.20.12.1
metric 200
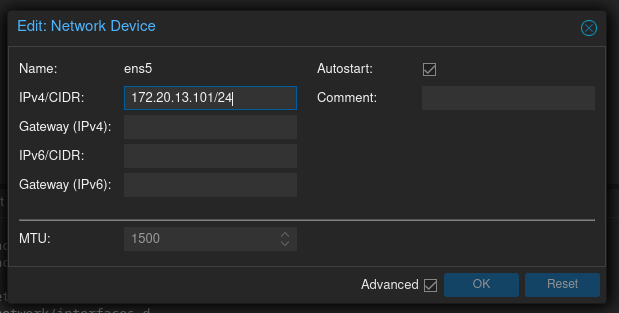
auto ens5
allow-hotplug ens5
iface ens5 inet static
address 172.20.13.XXX/24
dns-nameservers 8.8.8.8
gateway 172.20.13.1
metric 300
auto ens6
allow-hotplug ens6
iface ens6 inet static
address 172.20.14.XXX/24
dns-nameservers 8.8.8.8
gateway 172.20.14.1
metric 400
1
reboot
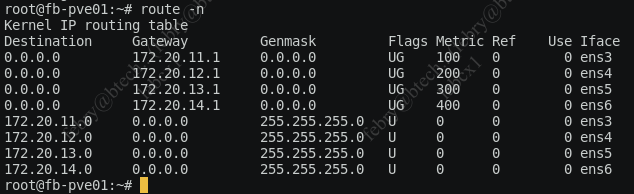
Routing Table
Update Hostname
1
2
3
hostnamectl set-hostname fb-pve01
hostnamectl set-hostname fb-pve02
hostnamectl set-hostname fb-pve03
Update Timezone
1
timedatectl set-timezone Asia/Jakarta
Update Hosts Files
1
2
3
4
5
6
7
8
9
10
11
12
13
14
15
16
17
18
19
20
21
22
23
24
nano /etc/hosts

---
127.0.0.1 localhost

# The following lines are desirable for IPv6 capable hosts
::1 ip6-localhost ip6-loopback
fe00::0 ip6-localnet
ff00::0 ip6-mcastprefix
ff02::1 ip6-allnodes
ff02::2 ip6-allrouters
ff02::3 ip6-allhosts

172.20.12.101 fb-pve01 pve1.febryandana.xyz
172.20.12.102 fb-pve02 pve2.febryandana.xyz
172.20.12.103 fb-pve03 pve3.febryandana.xyz

172.20.13.101 public.ceph.pve1.febryandana.xyz
172.20.13.102 public.ceph.pve2.febryandana.xyz
172.20.13.103 public.ceph.pve3.febryandana.xyz

172.20.14.101 cluster.ceph.pve1.febryandana.xyz
172.20.14.102 cluster.ceph.pve2.febryandana.xyz
172.20.14.103 cluster.ceph.pve3.febryandana.xyz
Upgrade System Packages
1
apt update && apt upgrade -y
Deploy Proxmox Cluster
Change Kernel to Proxmox Kernel
Add Proxmox VE repository
1
echo "deb [arch=amd64] http://download.proxmox.com/debian/pve bullseye pve-no-subscription" > /etc/apt/sources.list.d/pve-install-repo.list
Add Proxmox VE repository key
1
2
3
4
5
wget https://enterprise.proxmox.com/debian/proxmox-release-bullseye.gpg -O /etc/apt/trusted.gpg.d/proxmox-release-bullseye.gpg

# Verify (make sure checksum is same with below)
sha512sum /etc/apt/trusted.gpg.d/proxmox-release-bullseye.gpg
7fb03ec8a1675723d2853b84aa4fdb49a46a3bb72b9951361488bfd19b29aab0a789a4f8c7406e71a69aabbc727c936d3549731c4659ffa1a08f44db8fdcebfa  /etc/apt/trusted.gpg.d/proxmox-release-bullseye.gpg
Update system
1
apt update && apt full-upgrade -y
Install Proxmox VE Kernel LTS
1
2
apt install pve-kernel-5.15
reboot
Install Proxmox
Install Proxmox packages
1
apt install proxmox-ve postfix open-iscsi
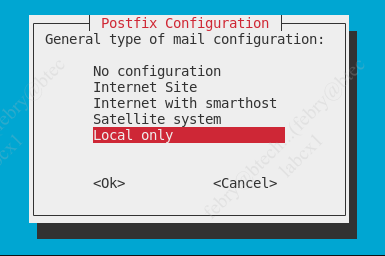
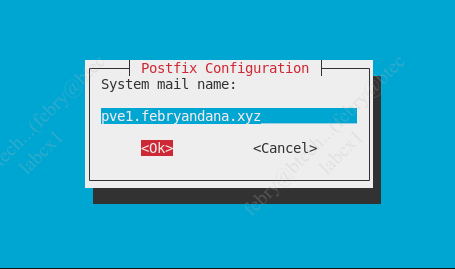
If you don’t have Mail Server, choose Local only for Postfix configuration
Use default setting provided
Remove Debian kernel
1
apt remove linux-image-amd64 'linux-image-5.10*'
Remove os-prober packages
1
apt remove os-prober
Update grub entry
1
update-grub
Now we can connect to Proxmox VE via web with self sign SSL certificates:
- fb-pve01: https://pve1.febryandana.xyz:8006
- fb-pve02: https://pve2.febryandana.xyz:8006
- fb-pve03: https://pve3.febryandana.xyz:8006
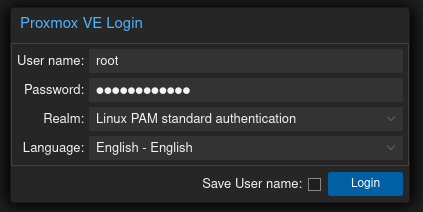
Login using root user and password and use Linux PAM standard authentication for Realm
Update PVE Network
Modify the network from inside cluster
1
From left menu: Datacenter -> node hostname -> System -> Network
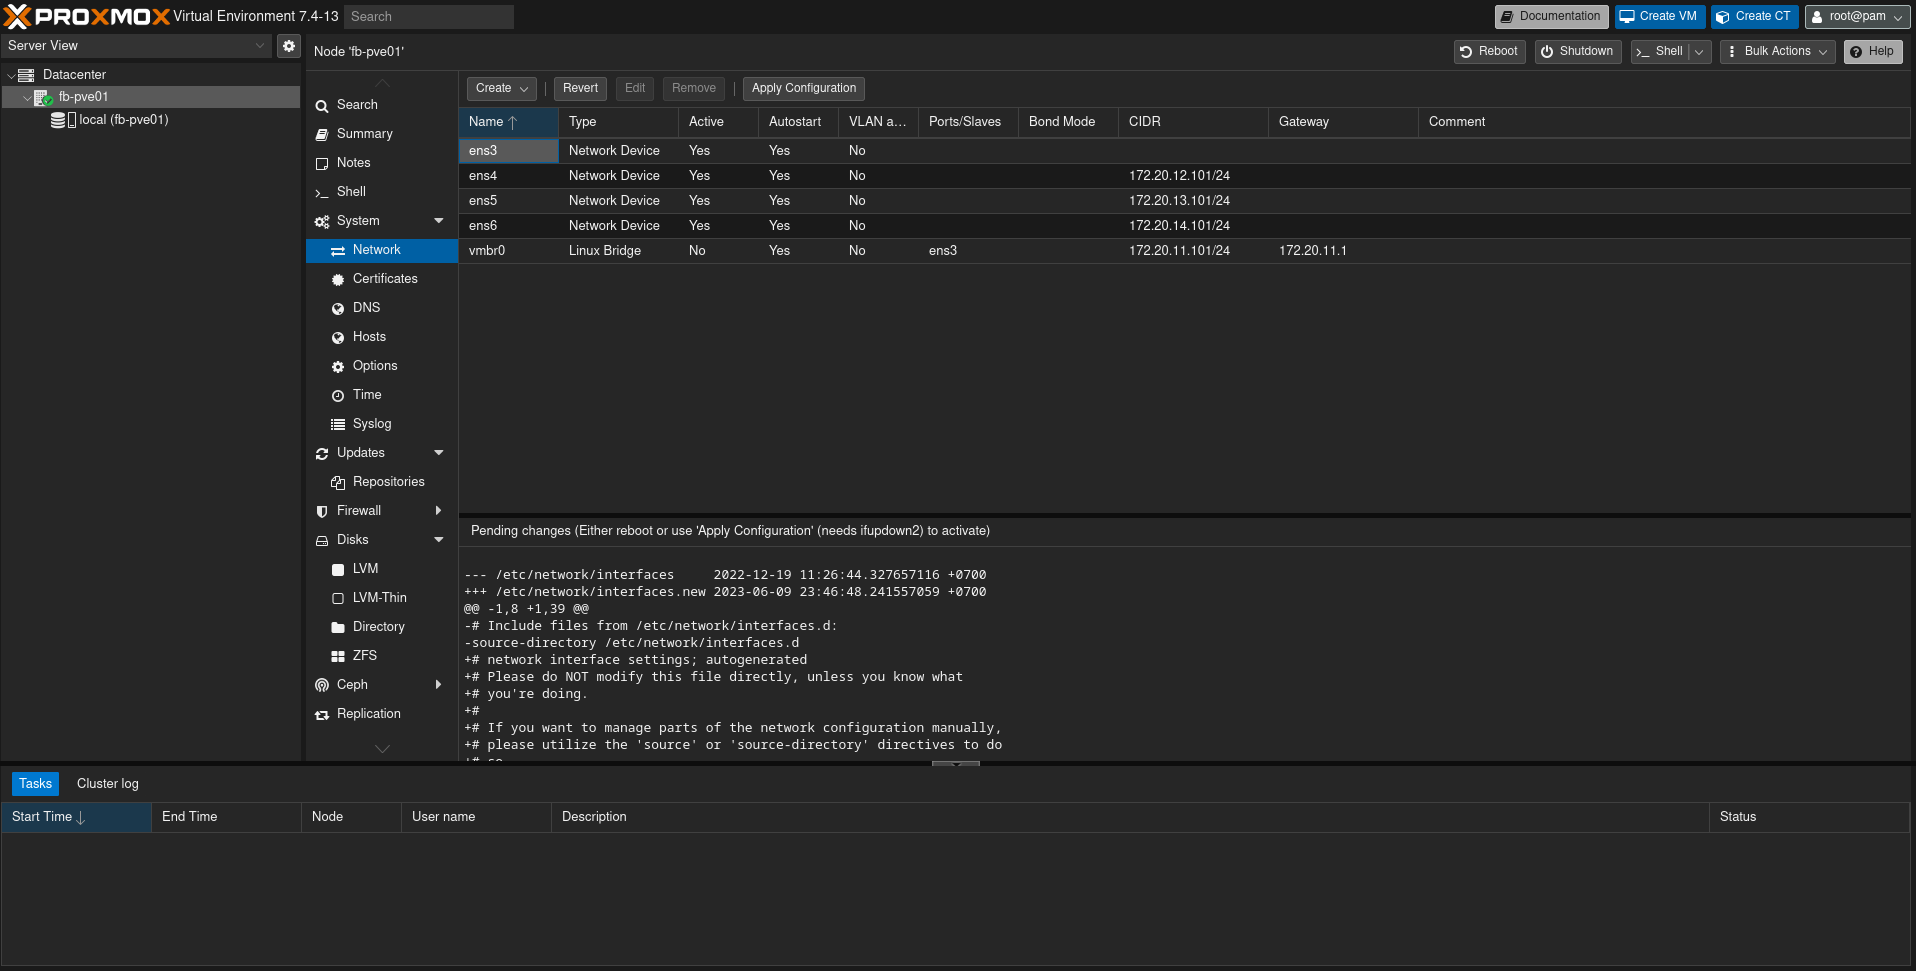
Update network configuration:
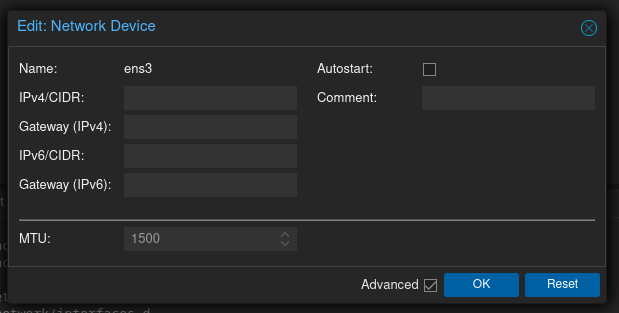
Use blank config for ens3 because we will use it for bridging
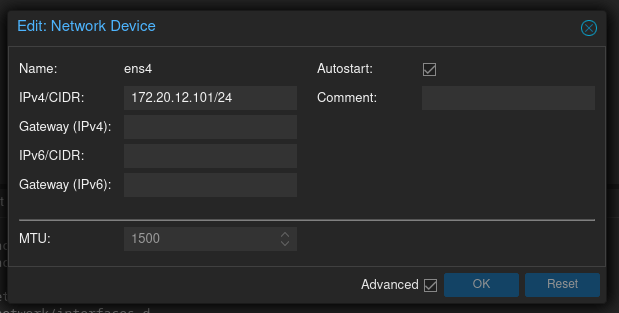
ens4
ens5
ens6

Create Linux Bridge Network named vmbr0
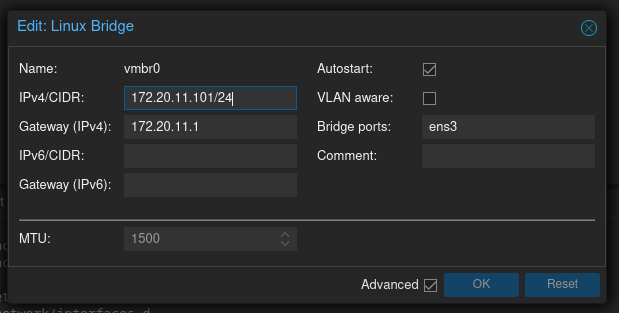
Do this step also in node 2 and 3 then click Apply Configuration. The configuration will be like this:

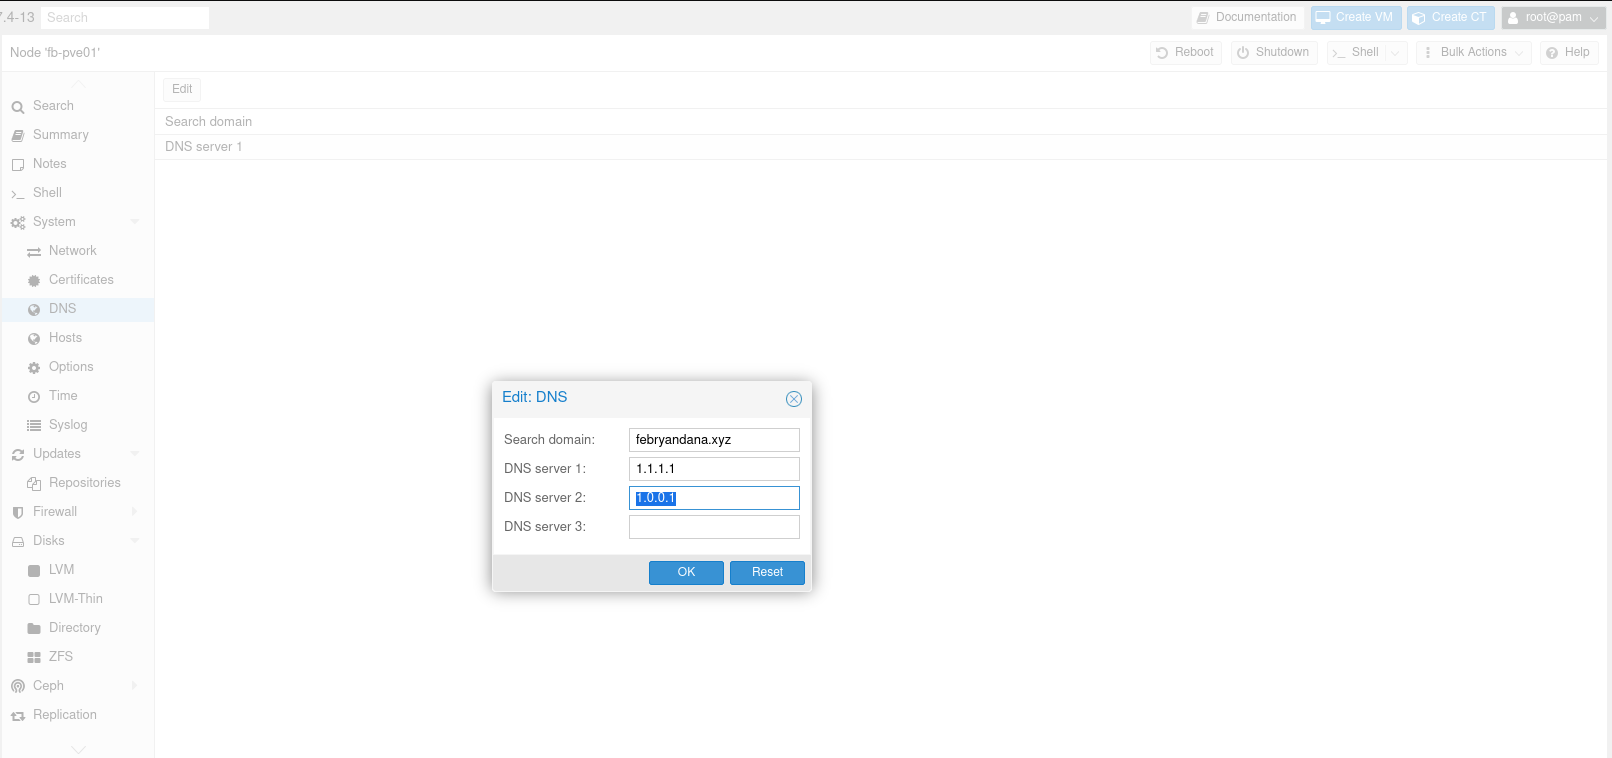
Update DNS Settings
Add DNS Server for Proxmox
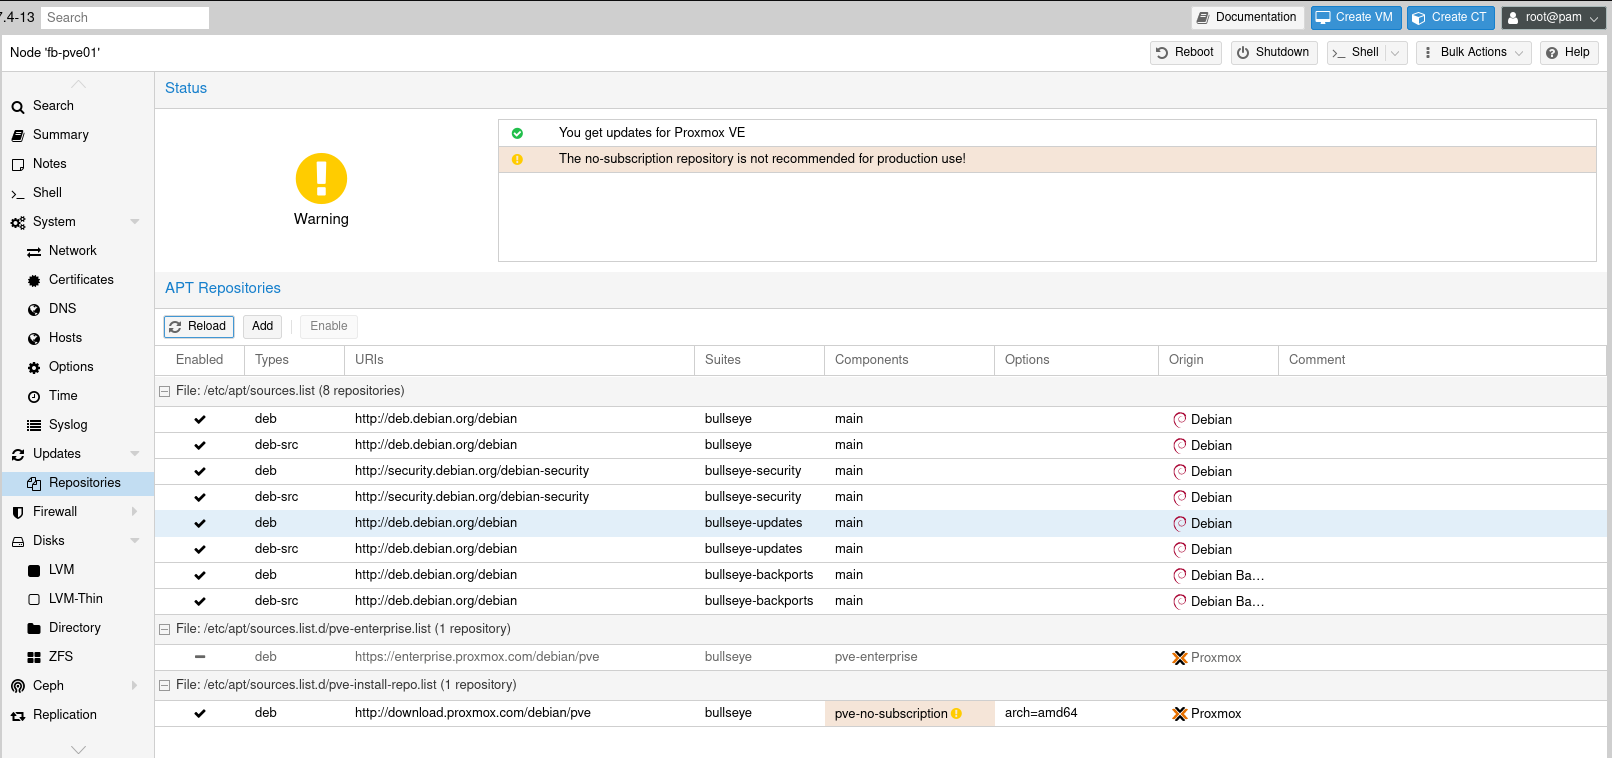
Update Proxmox Repository
Disable enterprise repository if we don’t use it
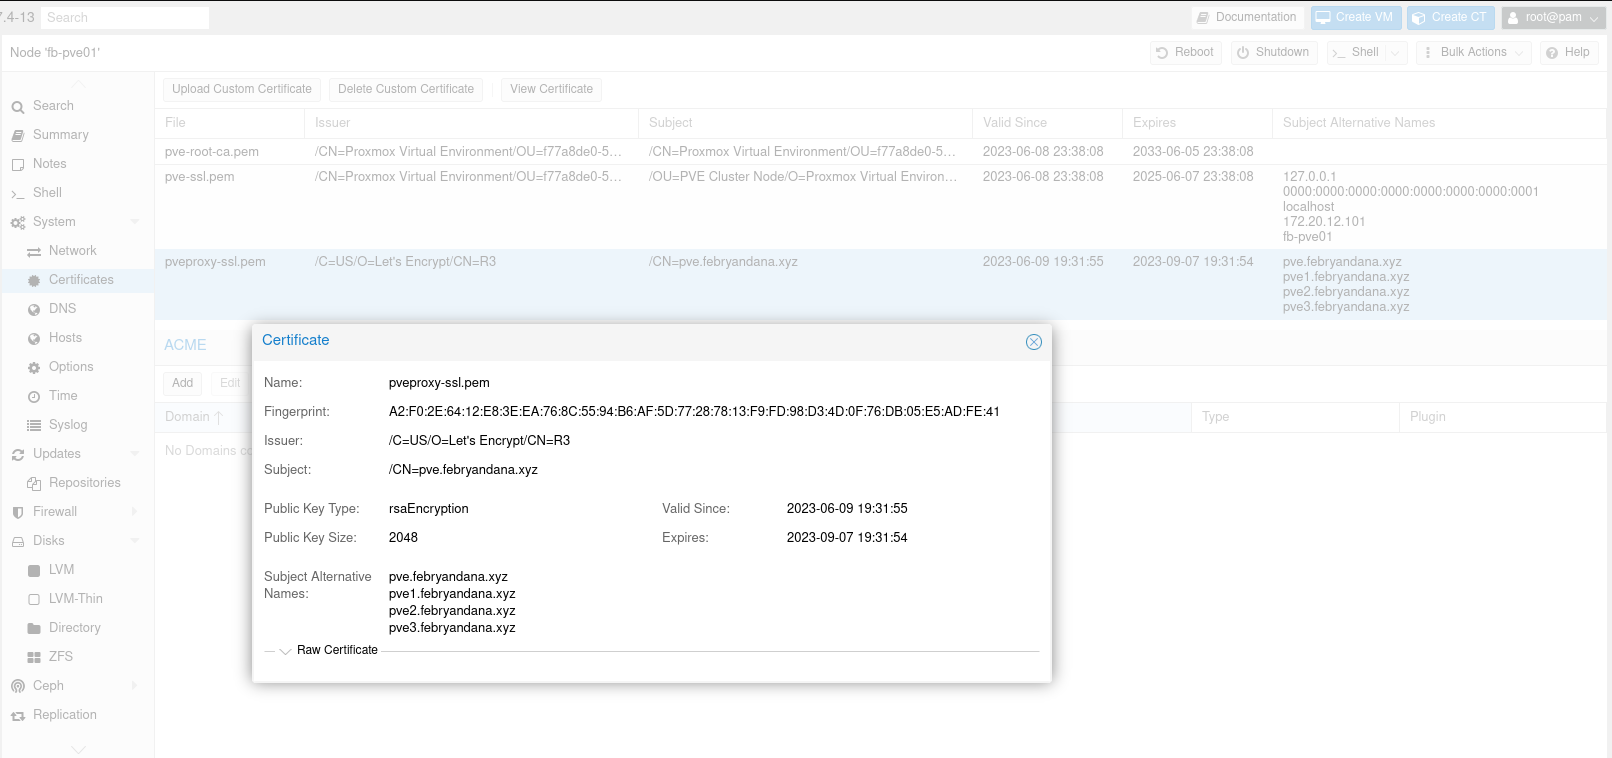
Optional - Change SSL/TLS Certificates
If we have other SSL/TLS certificates, we can add it to Proxmox nodes so that we don’t use the self sign certificate.
- Select nodes, then go to Certificates menu
Select
Upload Custom Certificatesand fill in the Private Key and Certificate Chain

- After uploading custom certificates, Proxmox will automatically use this certificates as default
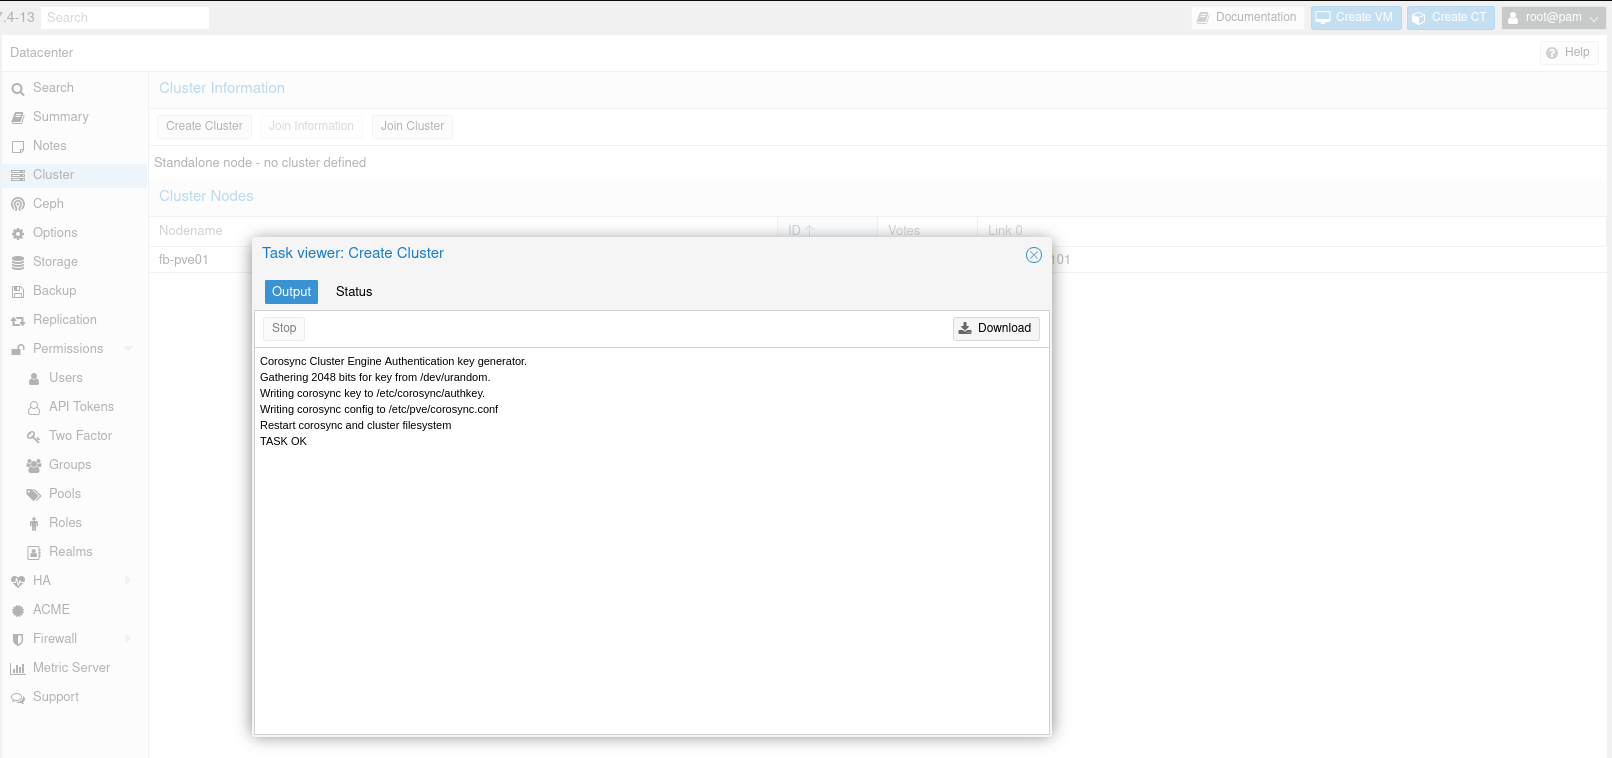
Create Proxmox Cluster
From node pve1, select Datacenter -> Cluster -> Create Cluster
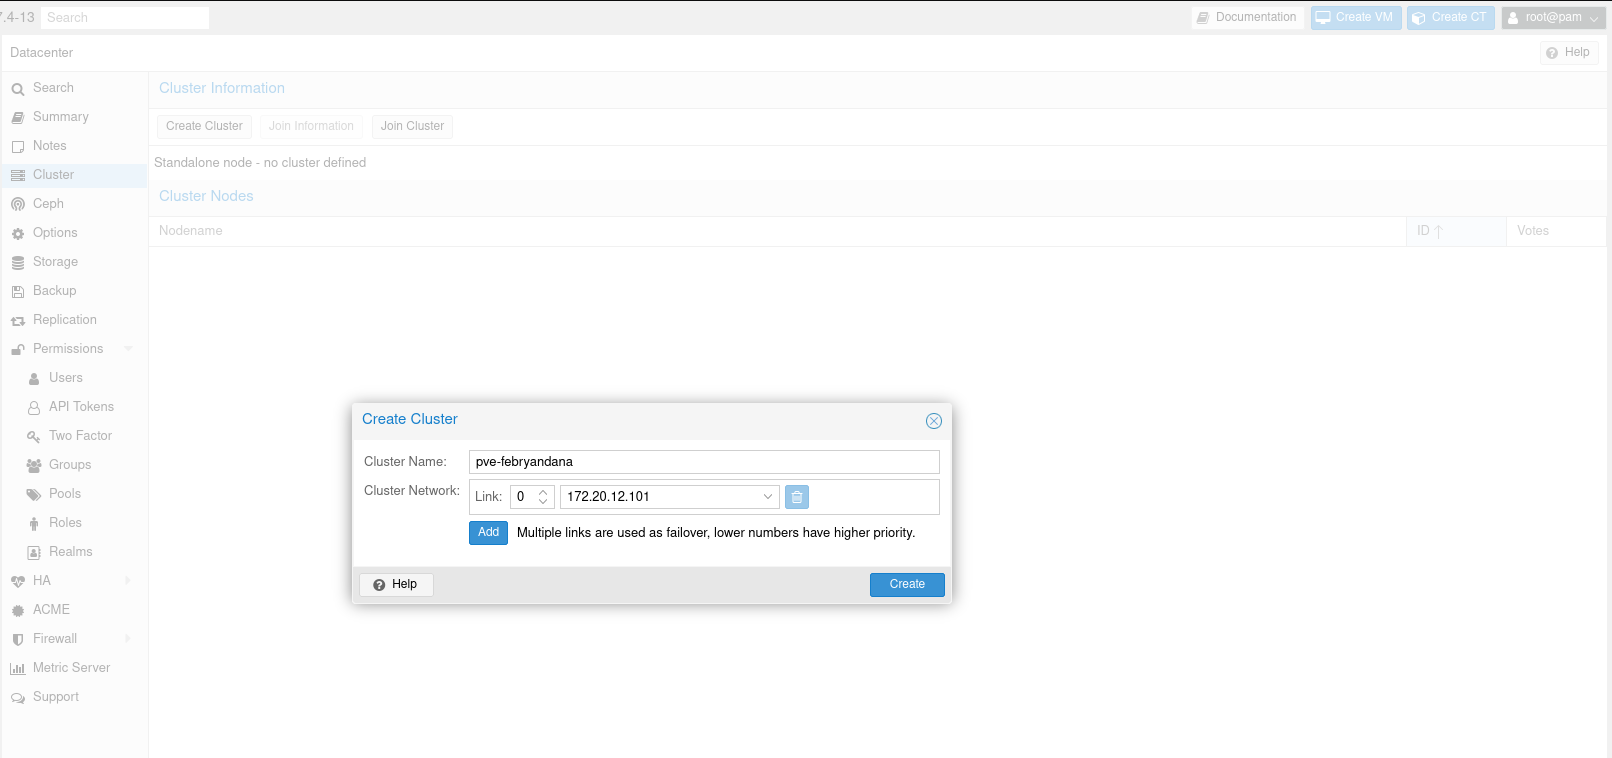
Wait until TASK OK
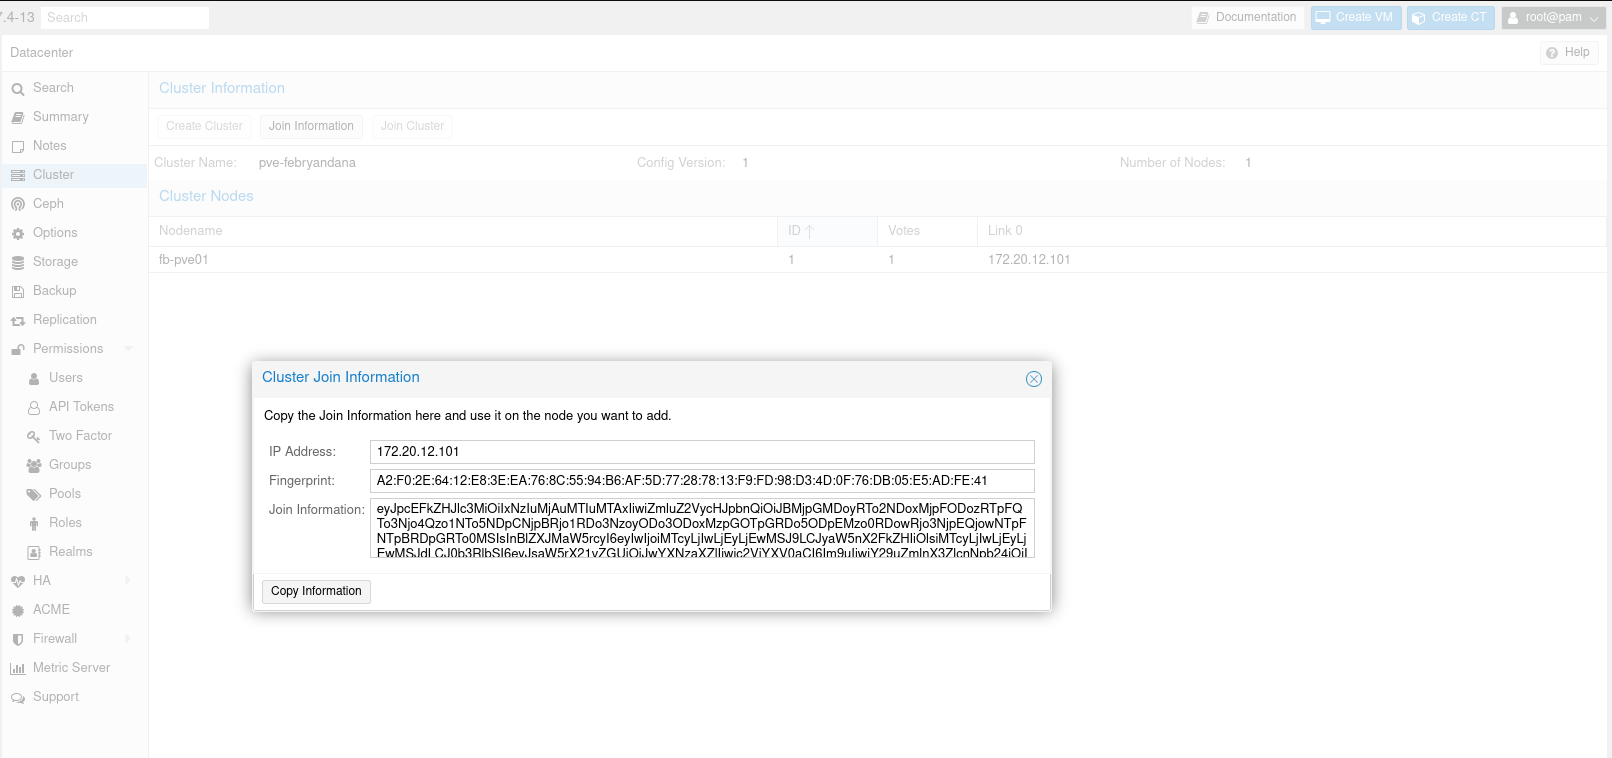
Then from the same place, click Join Information. We will use this info for joining other nodes
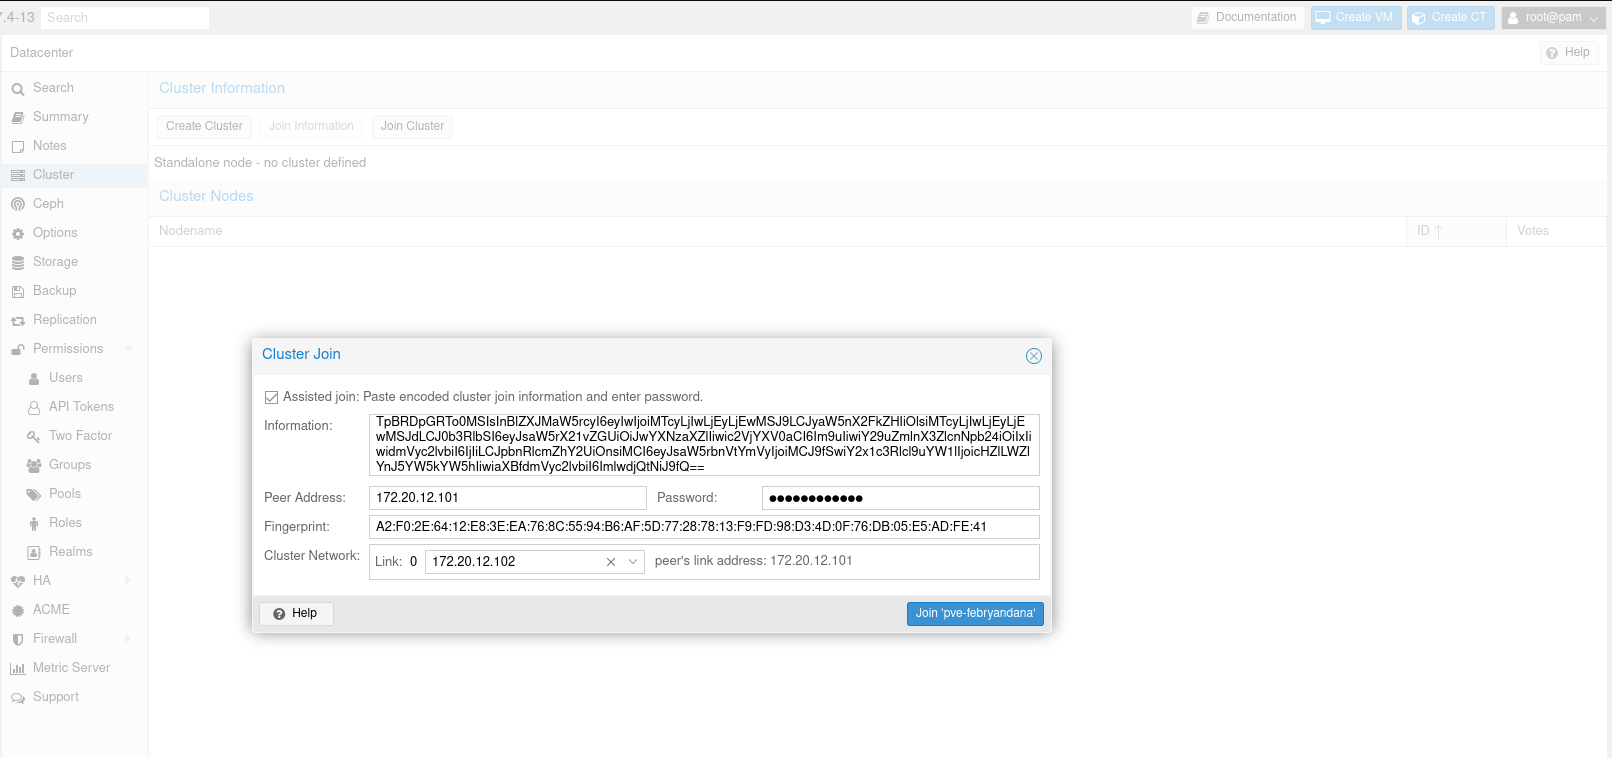
Join to Proxmox Cluster
From node 2 and 3, select Datacenter -> Cluster -> Join Cluster. Fill in information we copied from node 1 and other info needed such as root password and Cluster Network. Make sure to use root password from node 1 and same network fro Cluster Network.
After process joining nodes to cluster is done, we can check on every web UI that we have 3 nodes:
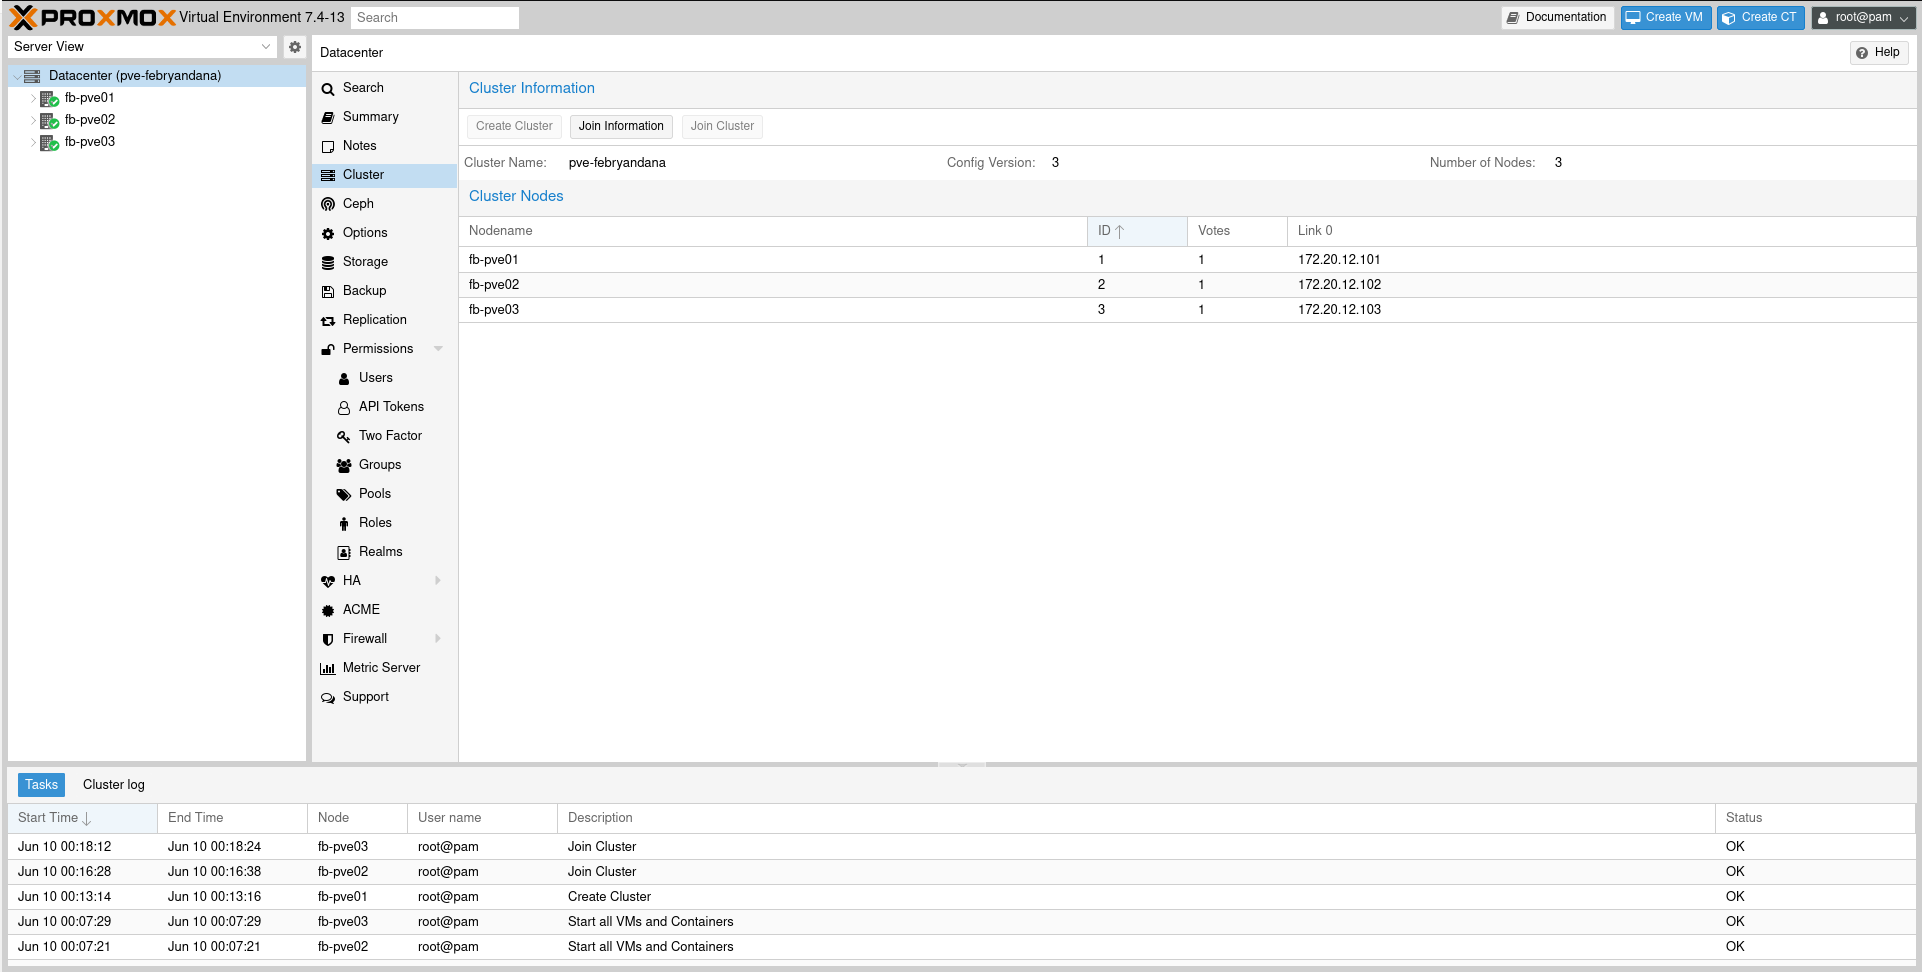
From now on, we can use one of the Proxmox VE Web UI to manage all nodes that we have.
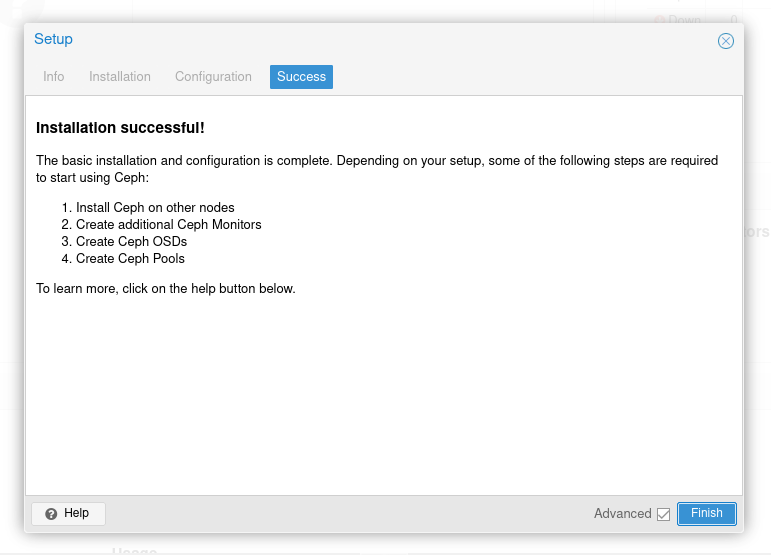
Deploy Ceph Cluster
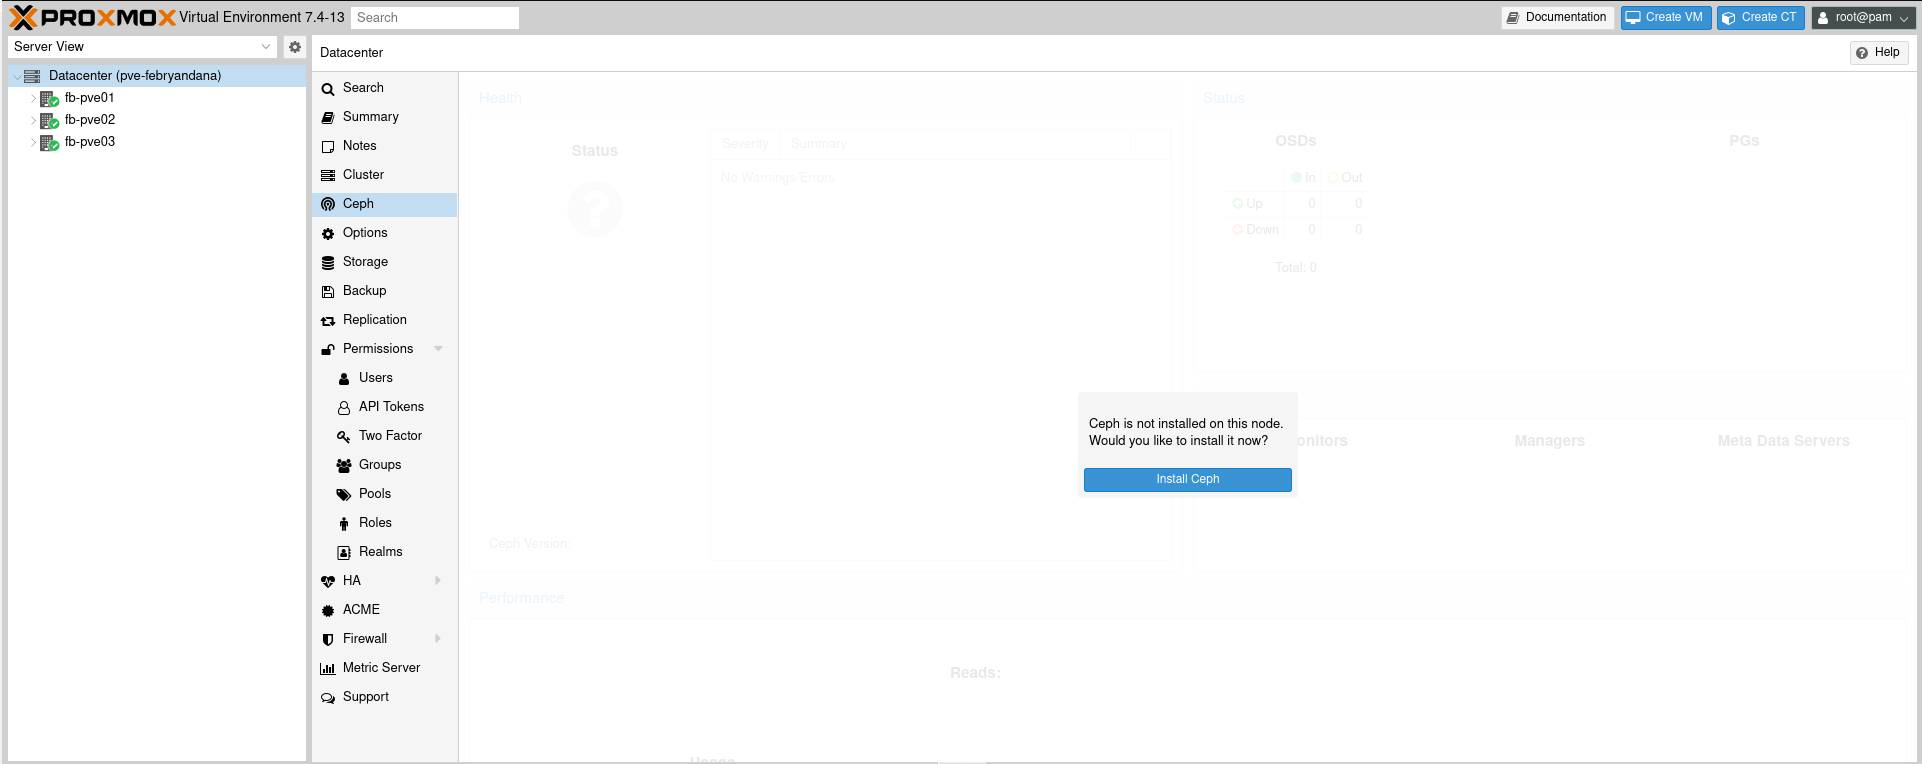
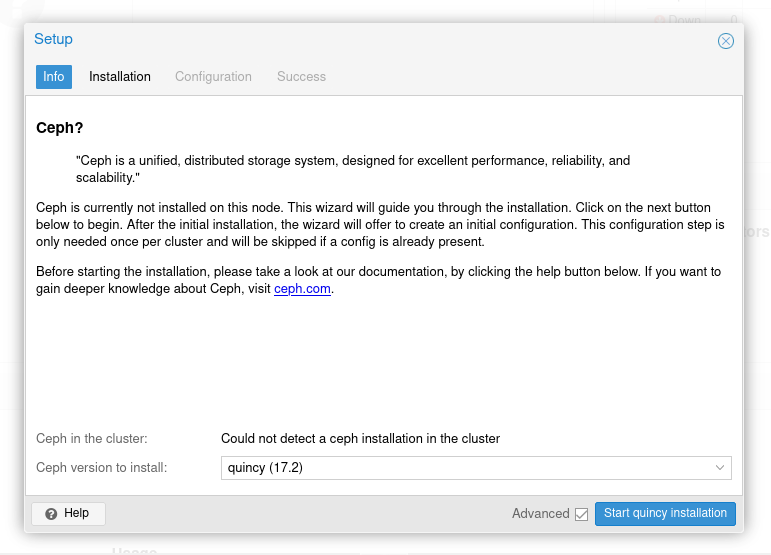
Install Ceph From Web UI
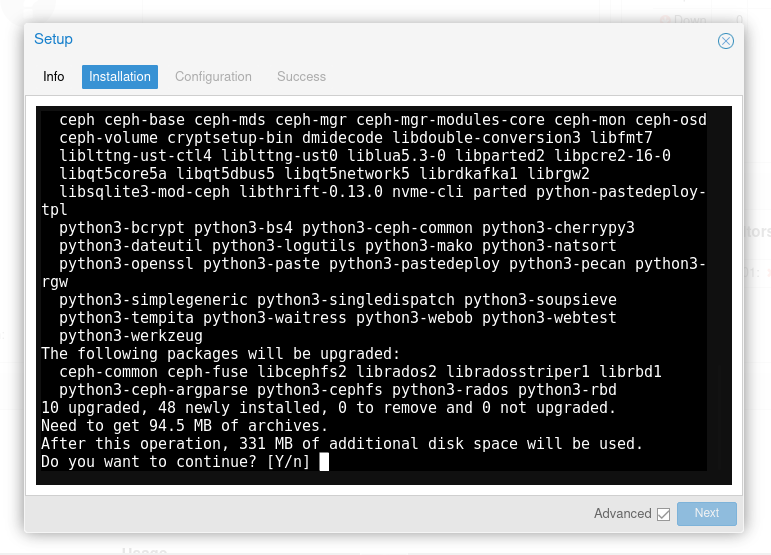
Repeat process for other nodes on cluster
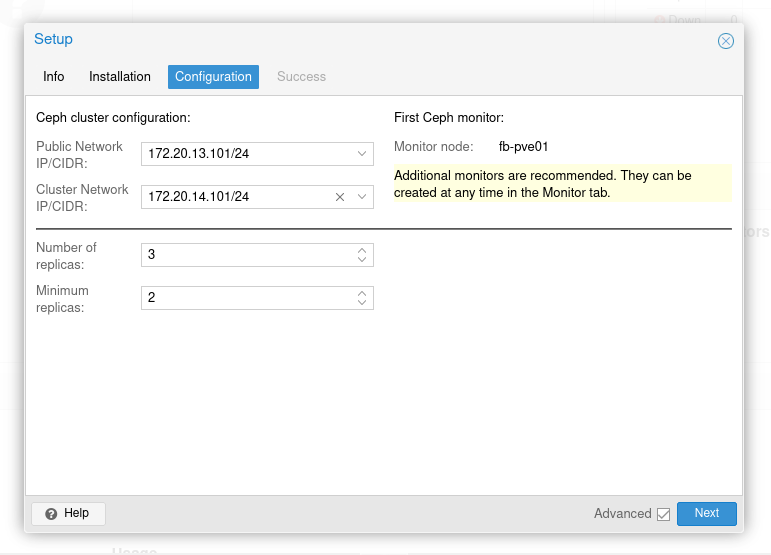
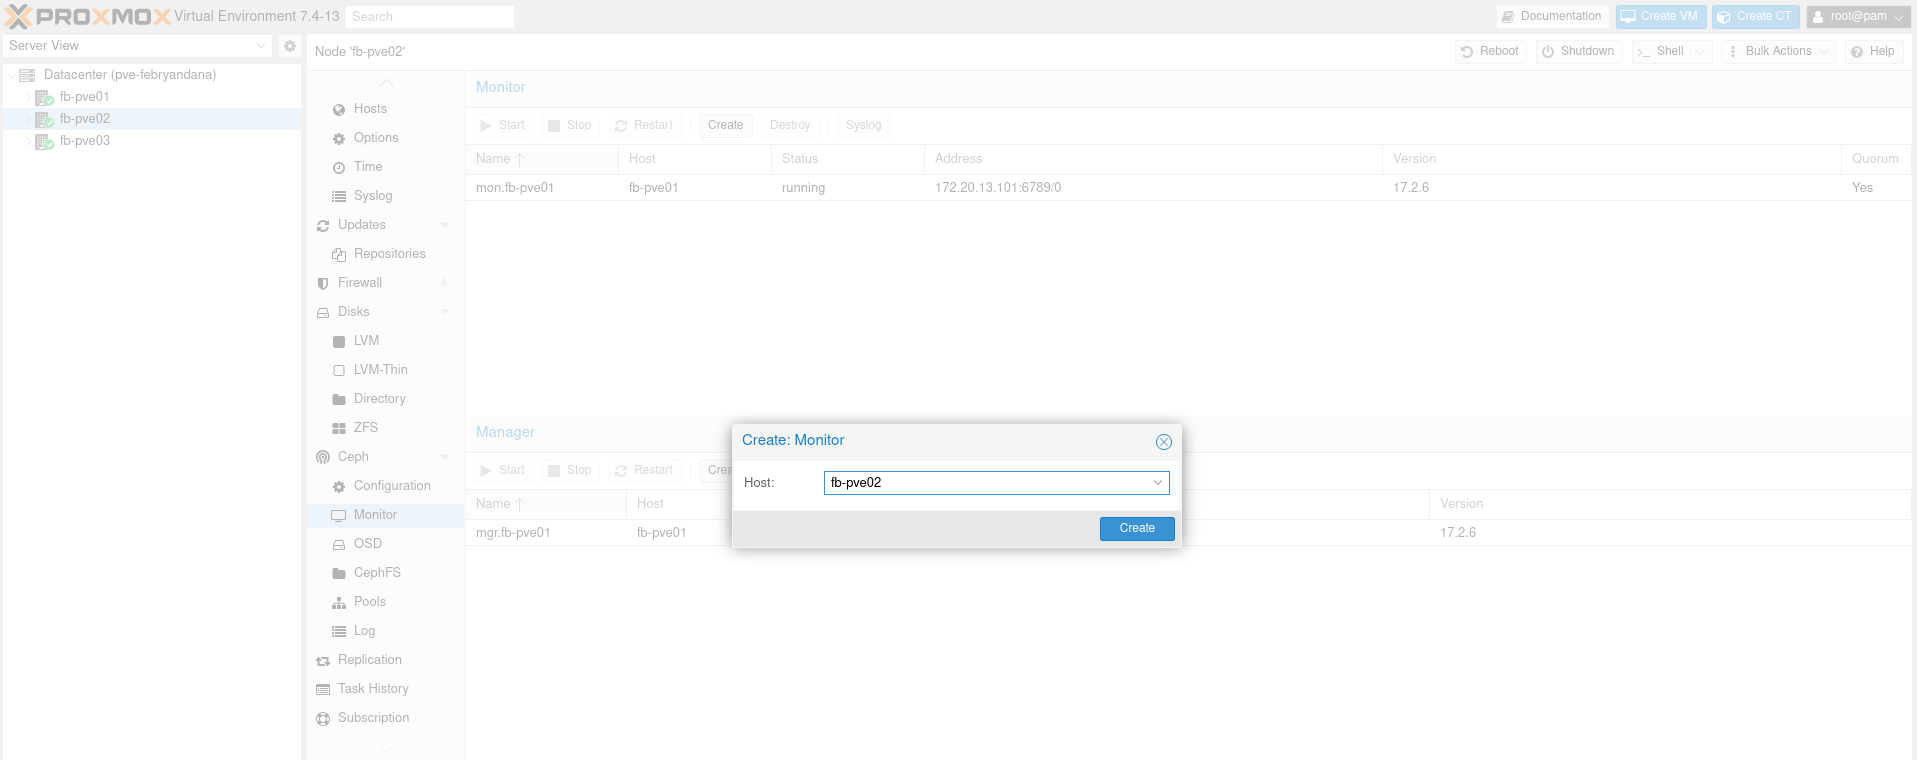
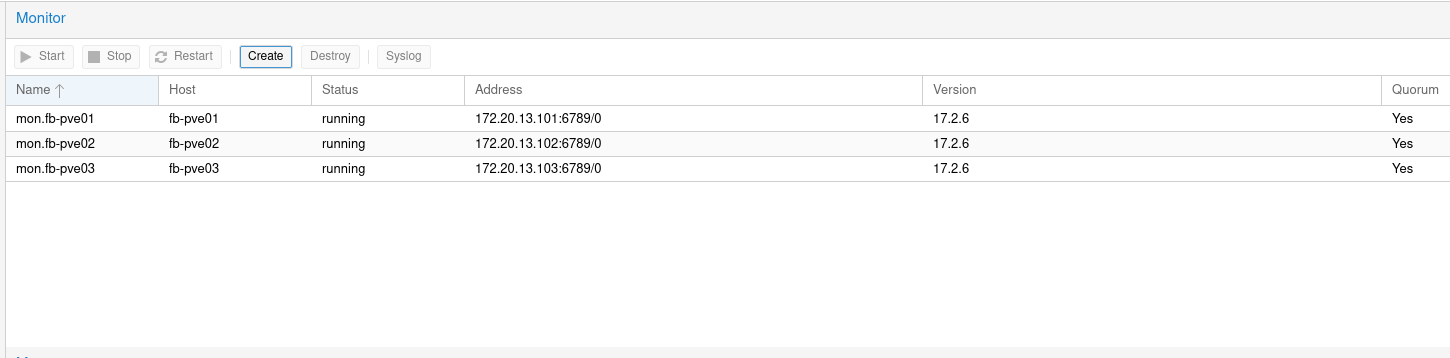
Create Ceph Monitor
On node 2 and node 3, create new monitor:
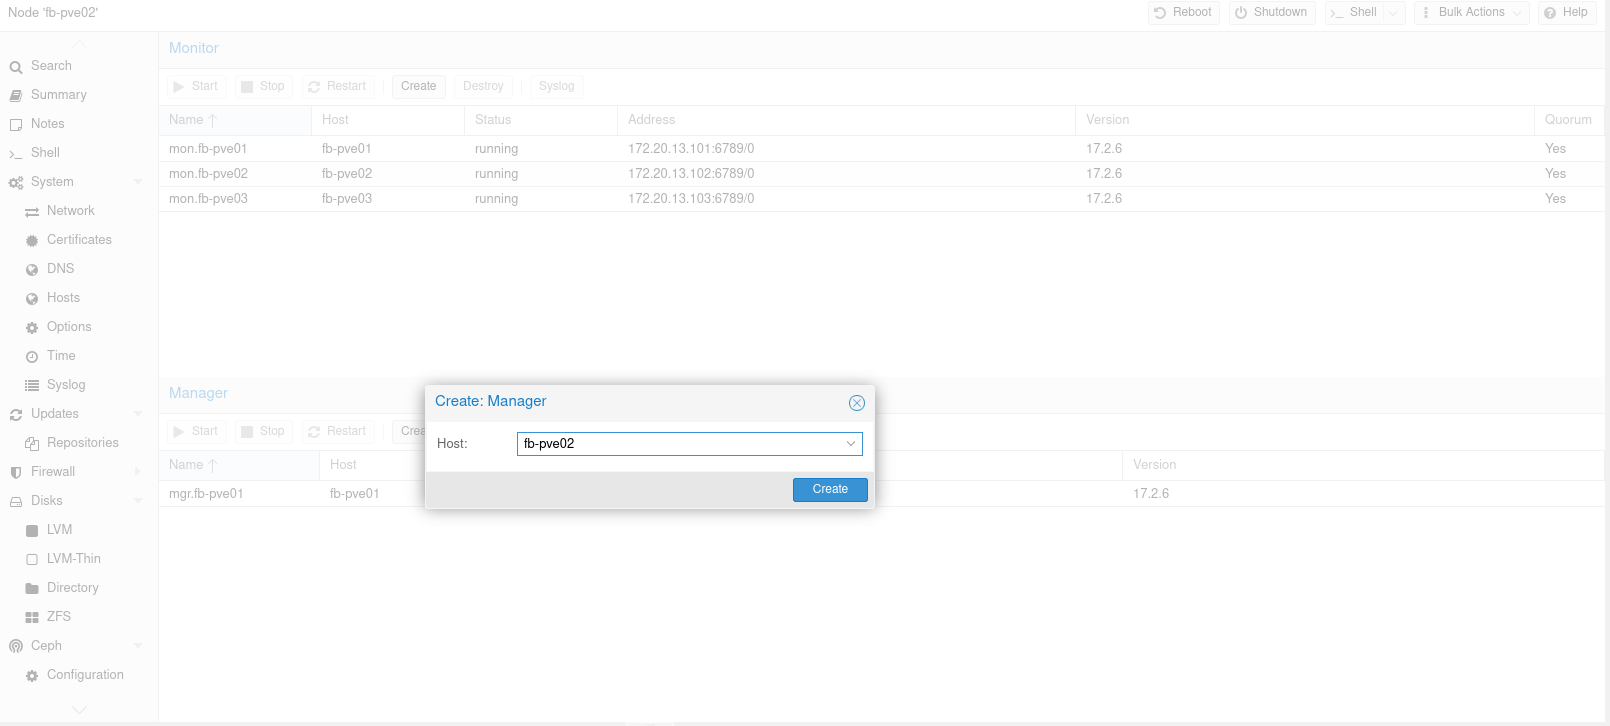
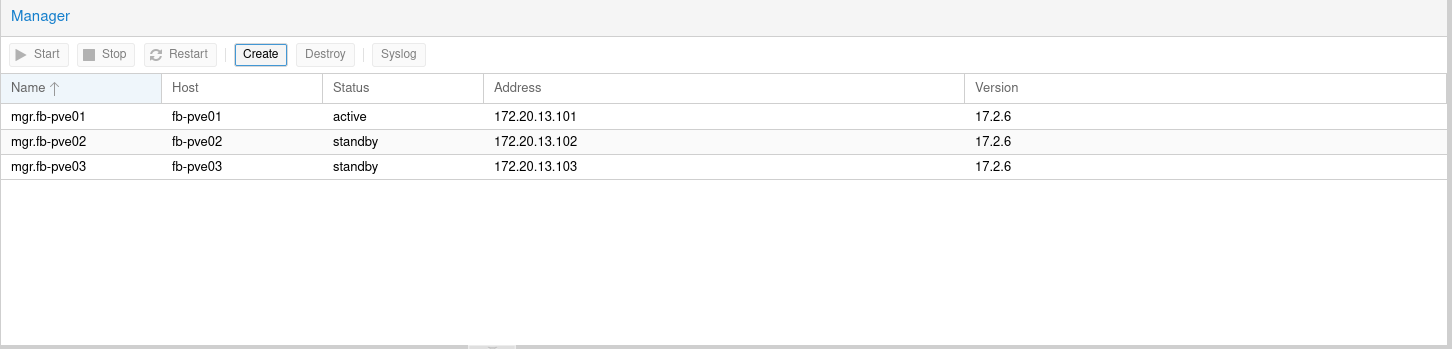
Create Ceph Manager
On the same page, we also need to create Ceph Manager for node 2 and 3:
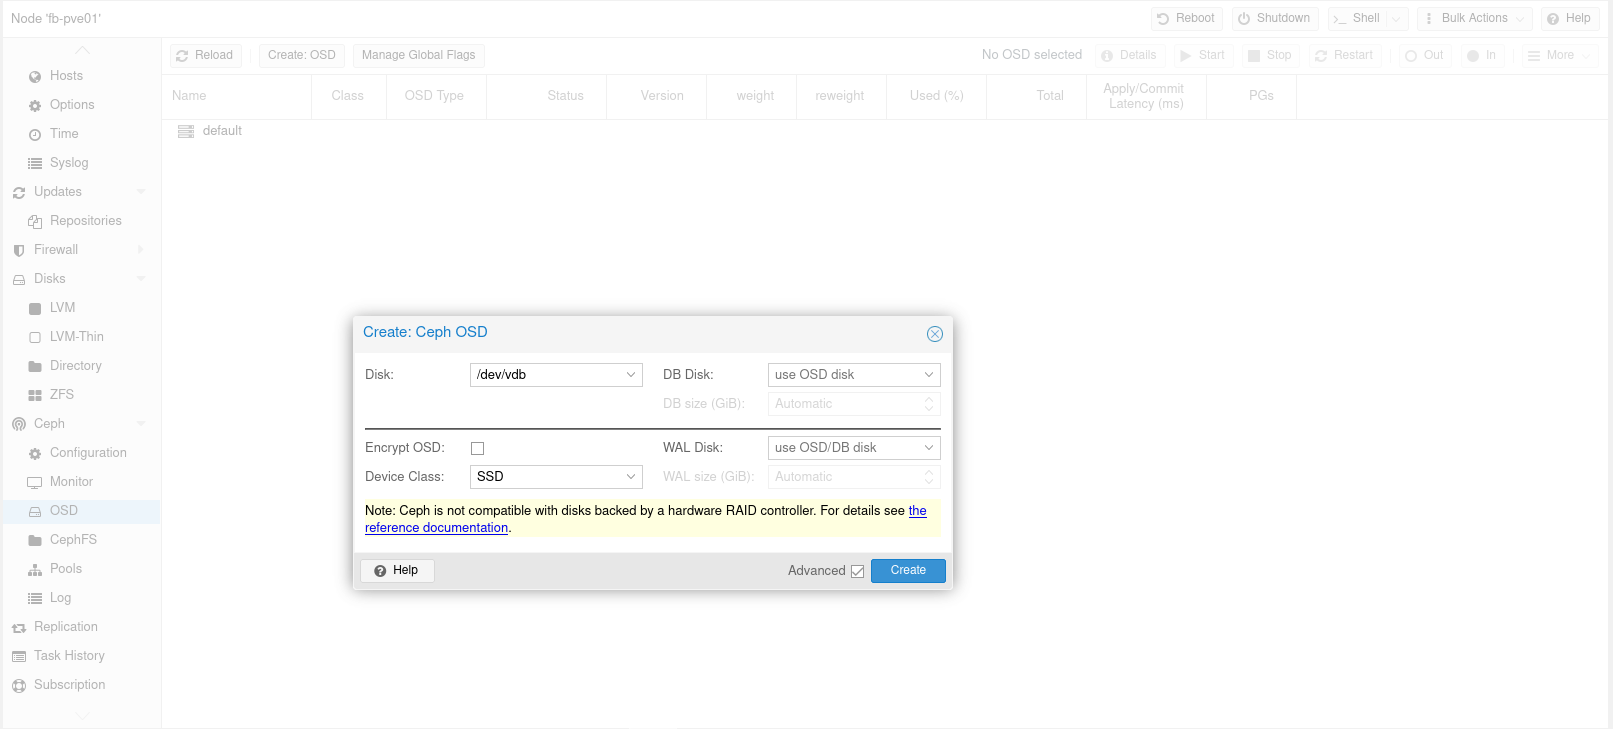
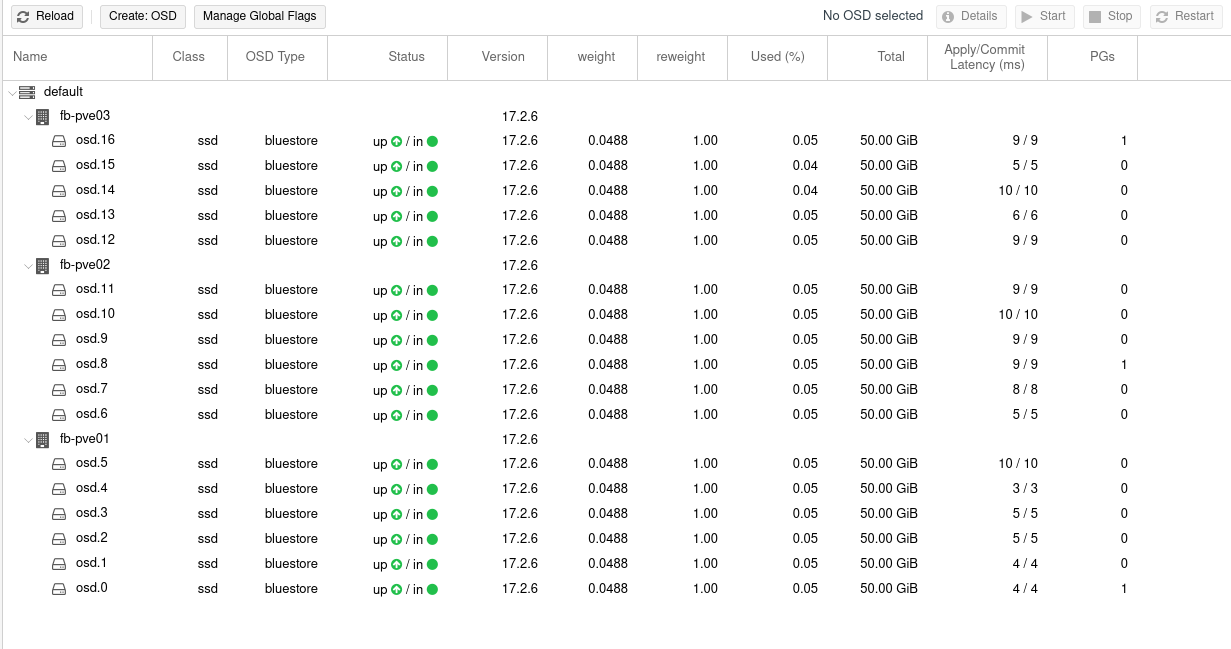
Create Ceph OSDs
Now we move to Ceph OSD menu. In this menu, we will create OSD with device class SSD from drive /dev/vdb to /dev/vdg on all nodes:
Create Ceph Pool for VM Disk Images and Containers
We need to create Ceph RBD pool to store our VM and LXC disk on Ceph so that it will get distributed on cluster.
From one of the nodes, select Ceph then Pools. From Pools menu we can create new Ceph pool:
Ceph Pool
ceph_vmsfor storing VM disk
Ceph Pool
ceph_containersfor storing LXC disk
Now we have Ceph RBD pool to store our VM and LXC on Ceph so that they will get distributed and replicated across cluster

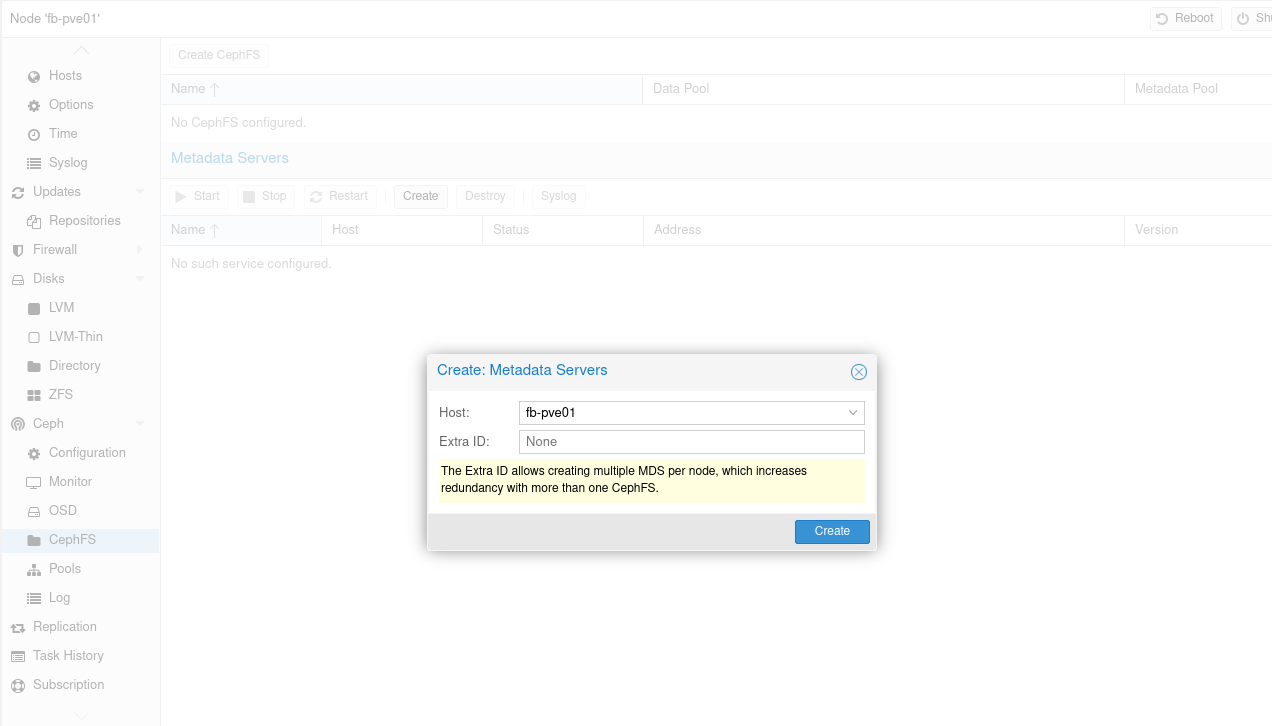
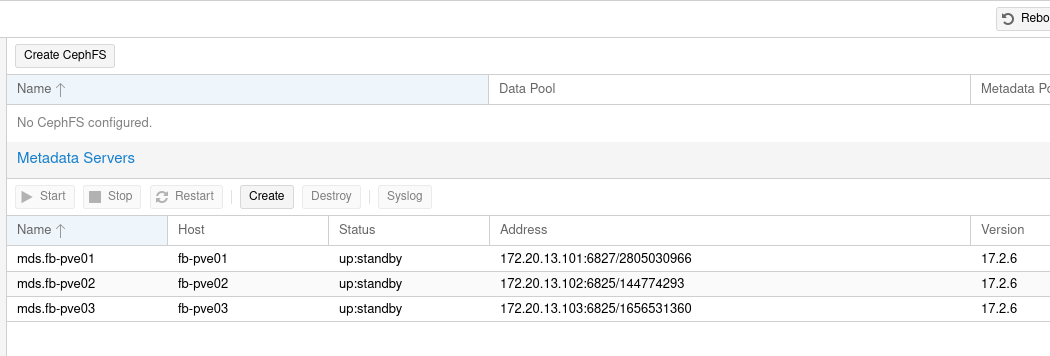
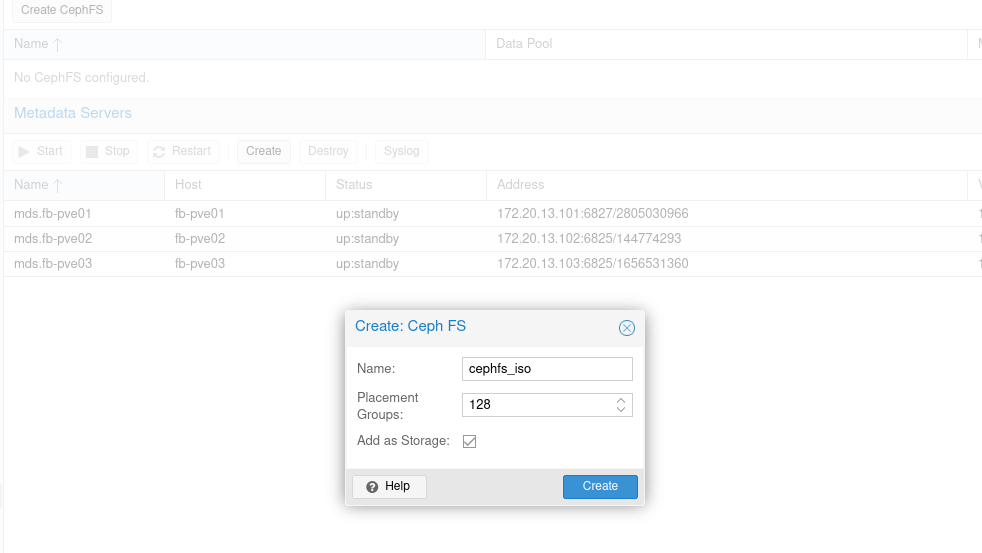
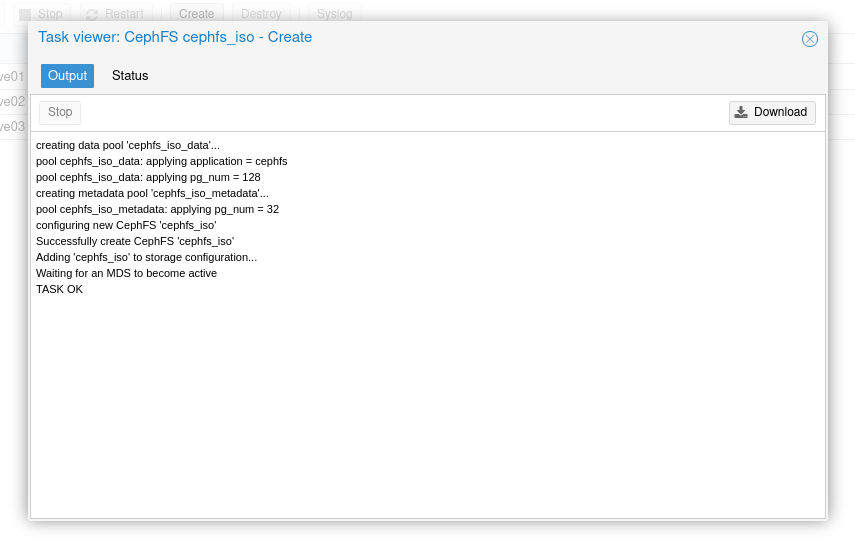
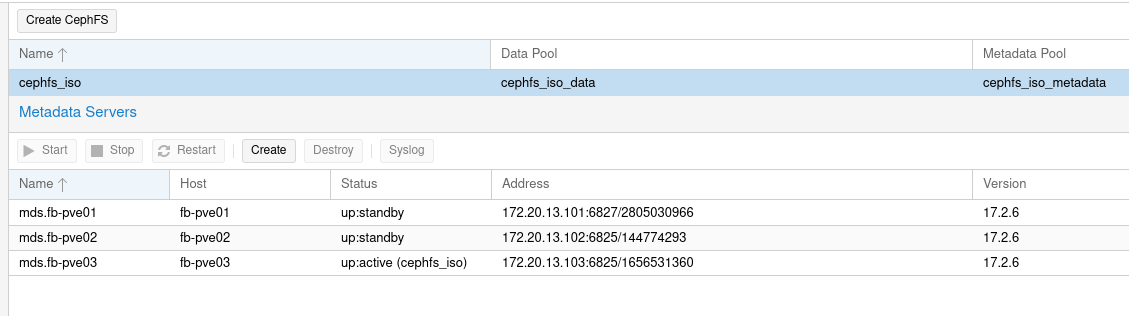
Create CephFS for ISO files
Create Metadata Servers on all nodes
Then create CephFS pool for storing ISO with name cephfs_iso
Add Ceph as Storage to Proxmox Cluster
From Datacenter, select Storage and then Add RBD and Add CephFS
First, we create RBD datastore for VMs disk using RBD pool ceph_vms 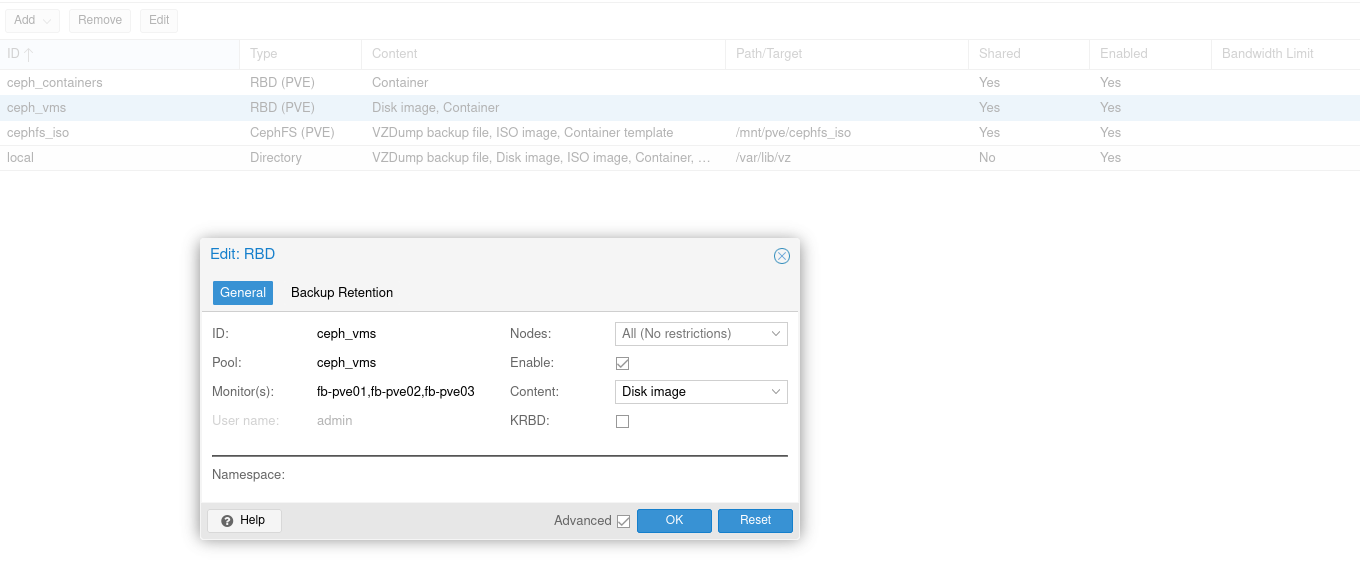
Second, we create RBD datastore for LXC disk using RBD pool ceph_containers 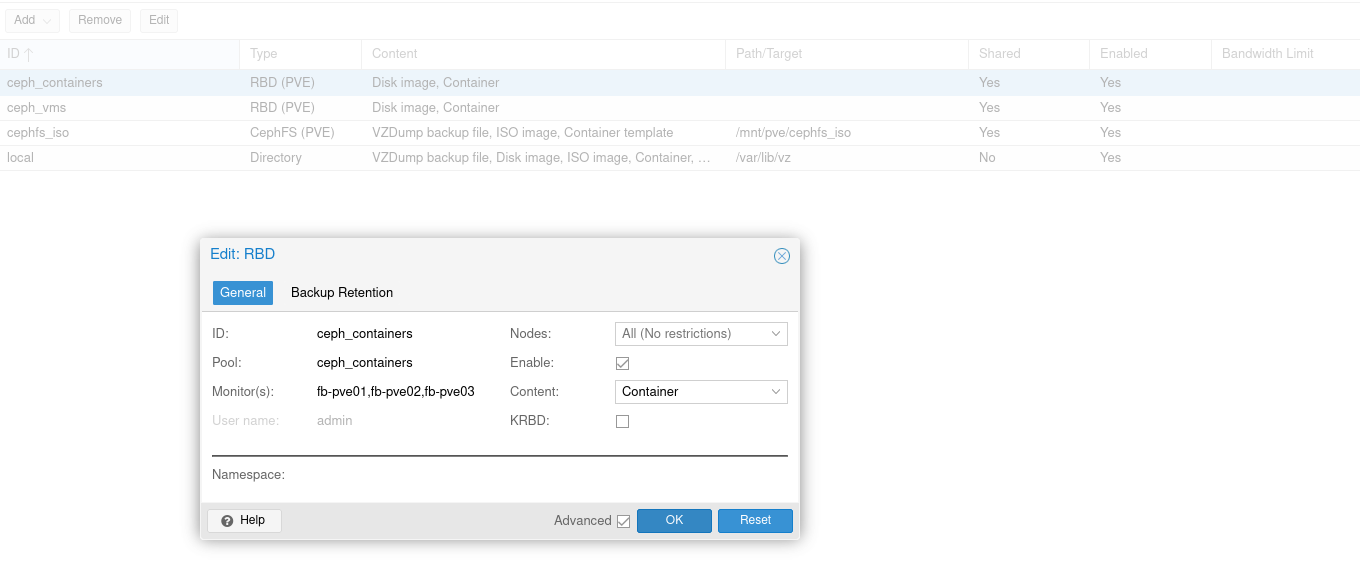
Third, we create CephFS datastore for storing ISO files using cephFS named cephfs_iso 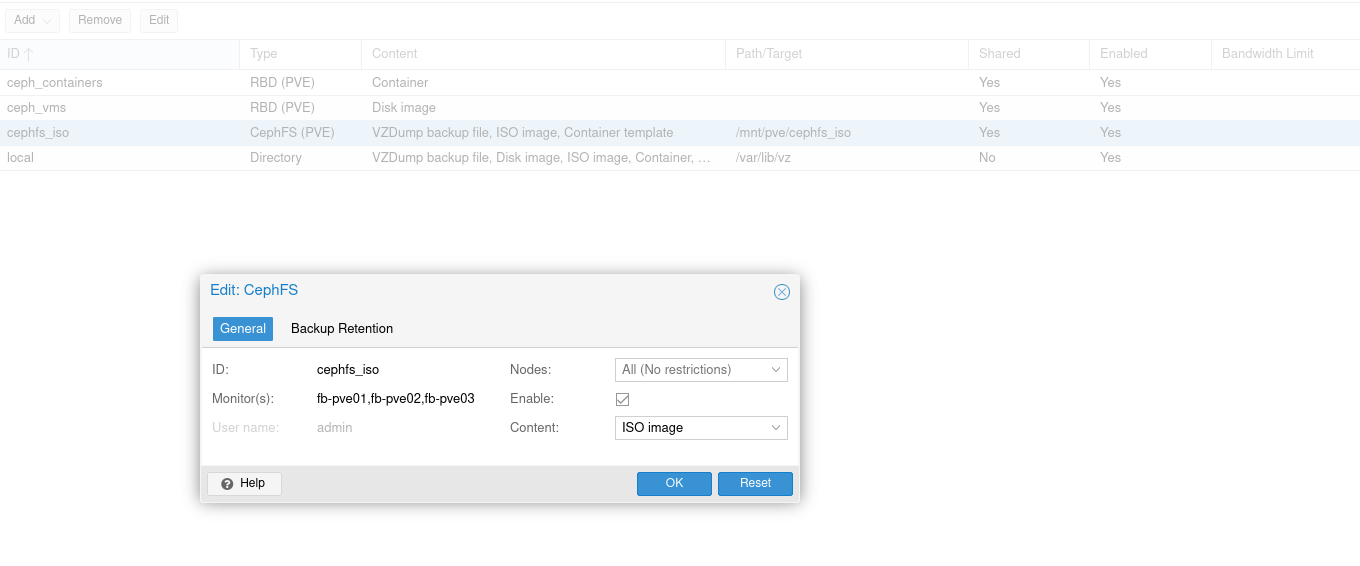
This is the final result after we add datastore:

Final Word
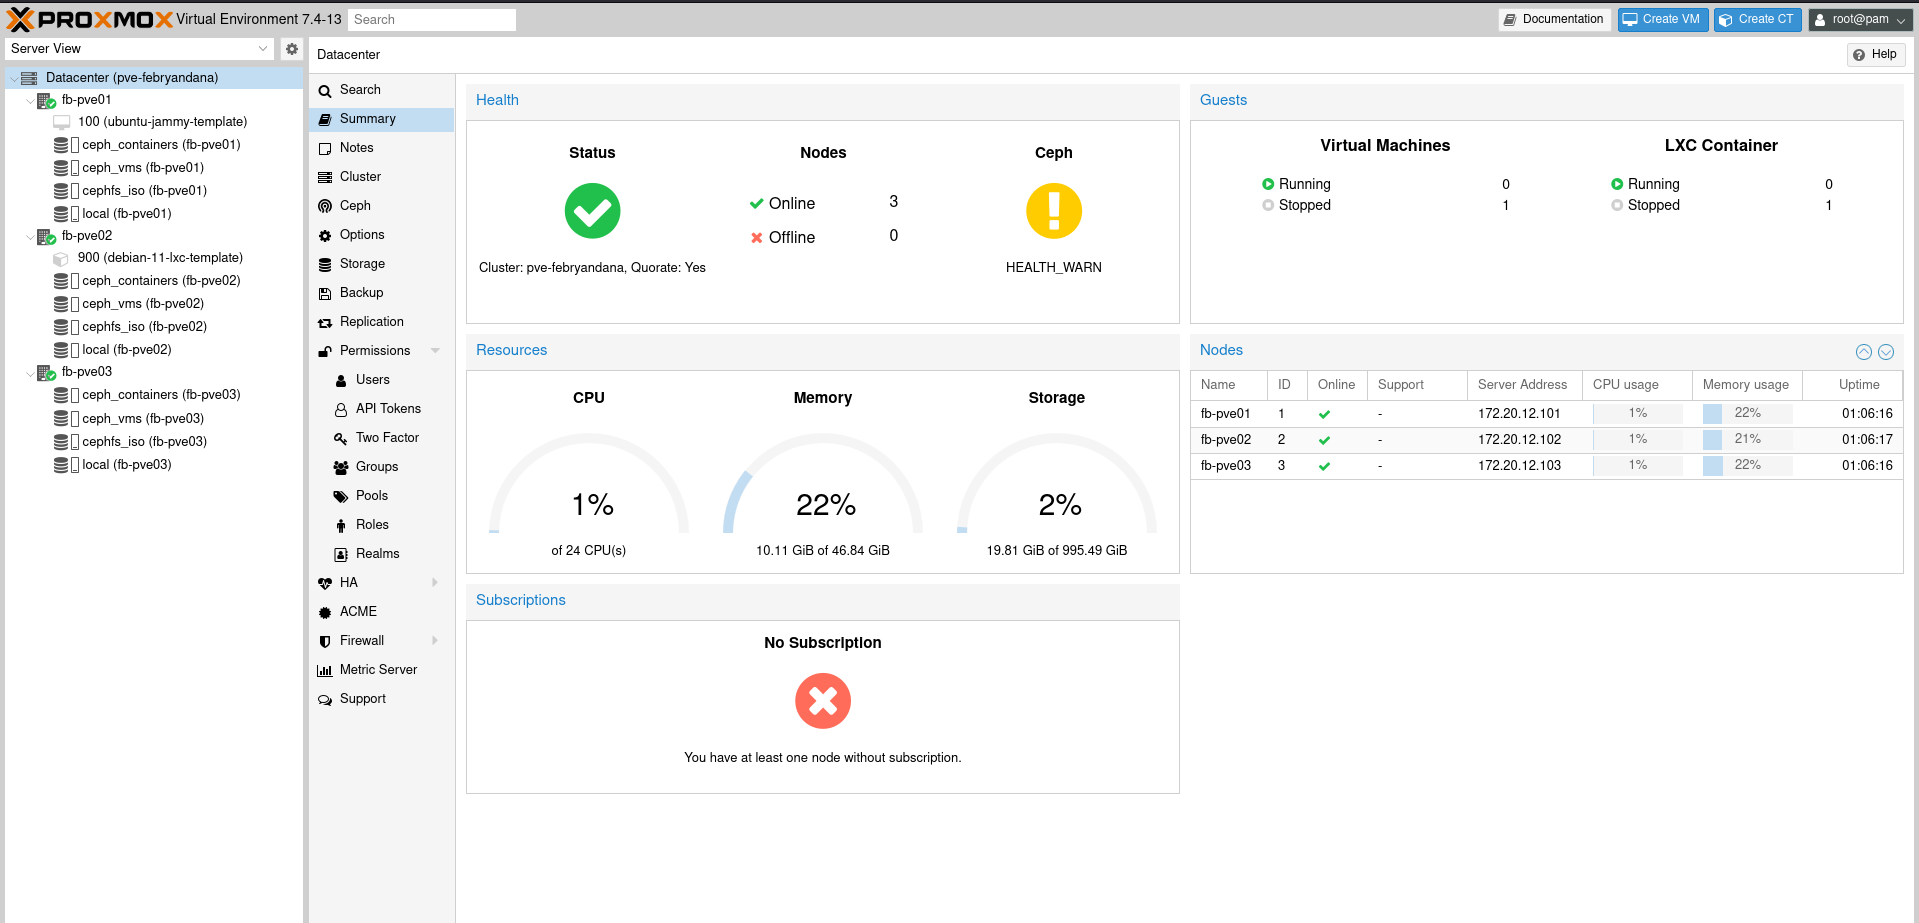
Finally it’s all done! Now we have a Proxmox VE Cluster with 3 hyperconverged nodes that act as our compute and storage nodes. With Ceph, we can have backup and replication across cluster so in the event of compute node down, we can still recover our data such as VMs, Containers, and templates.
Comments powered by Disqus.