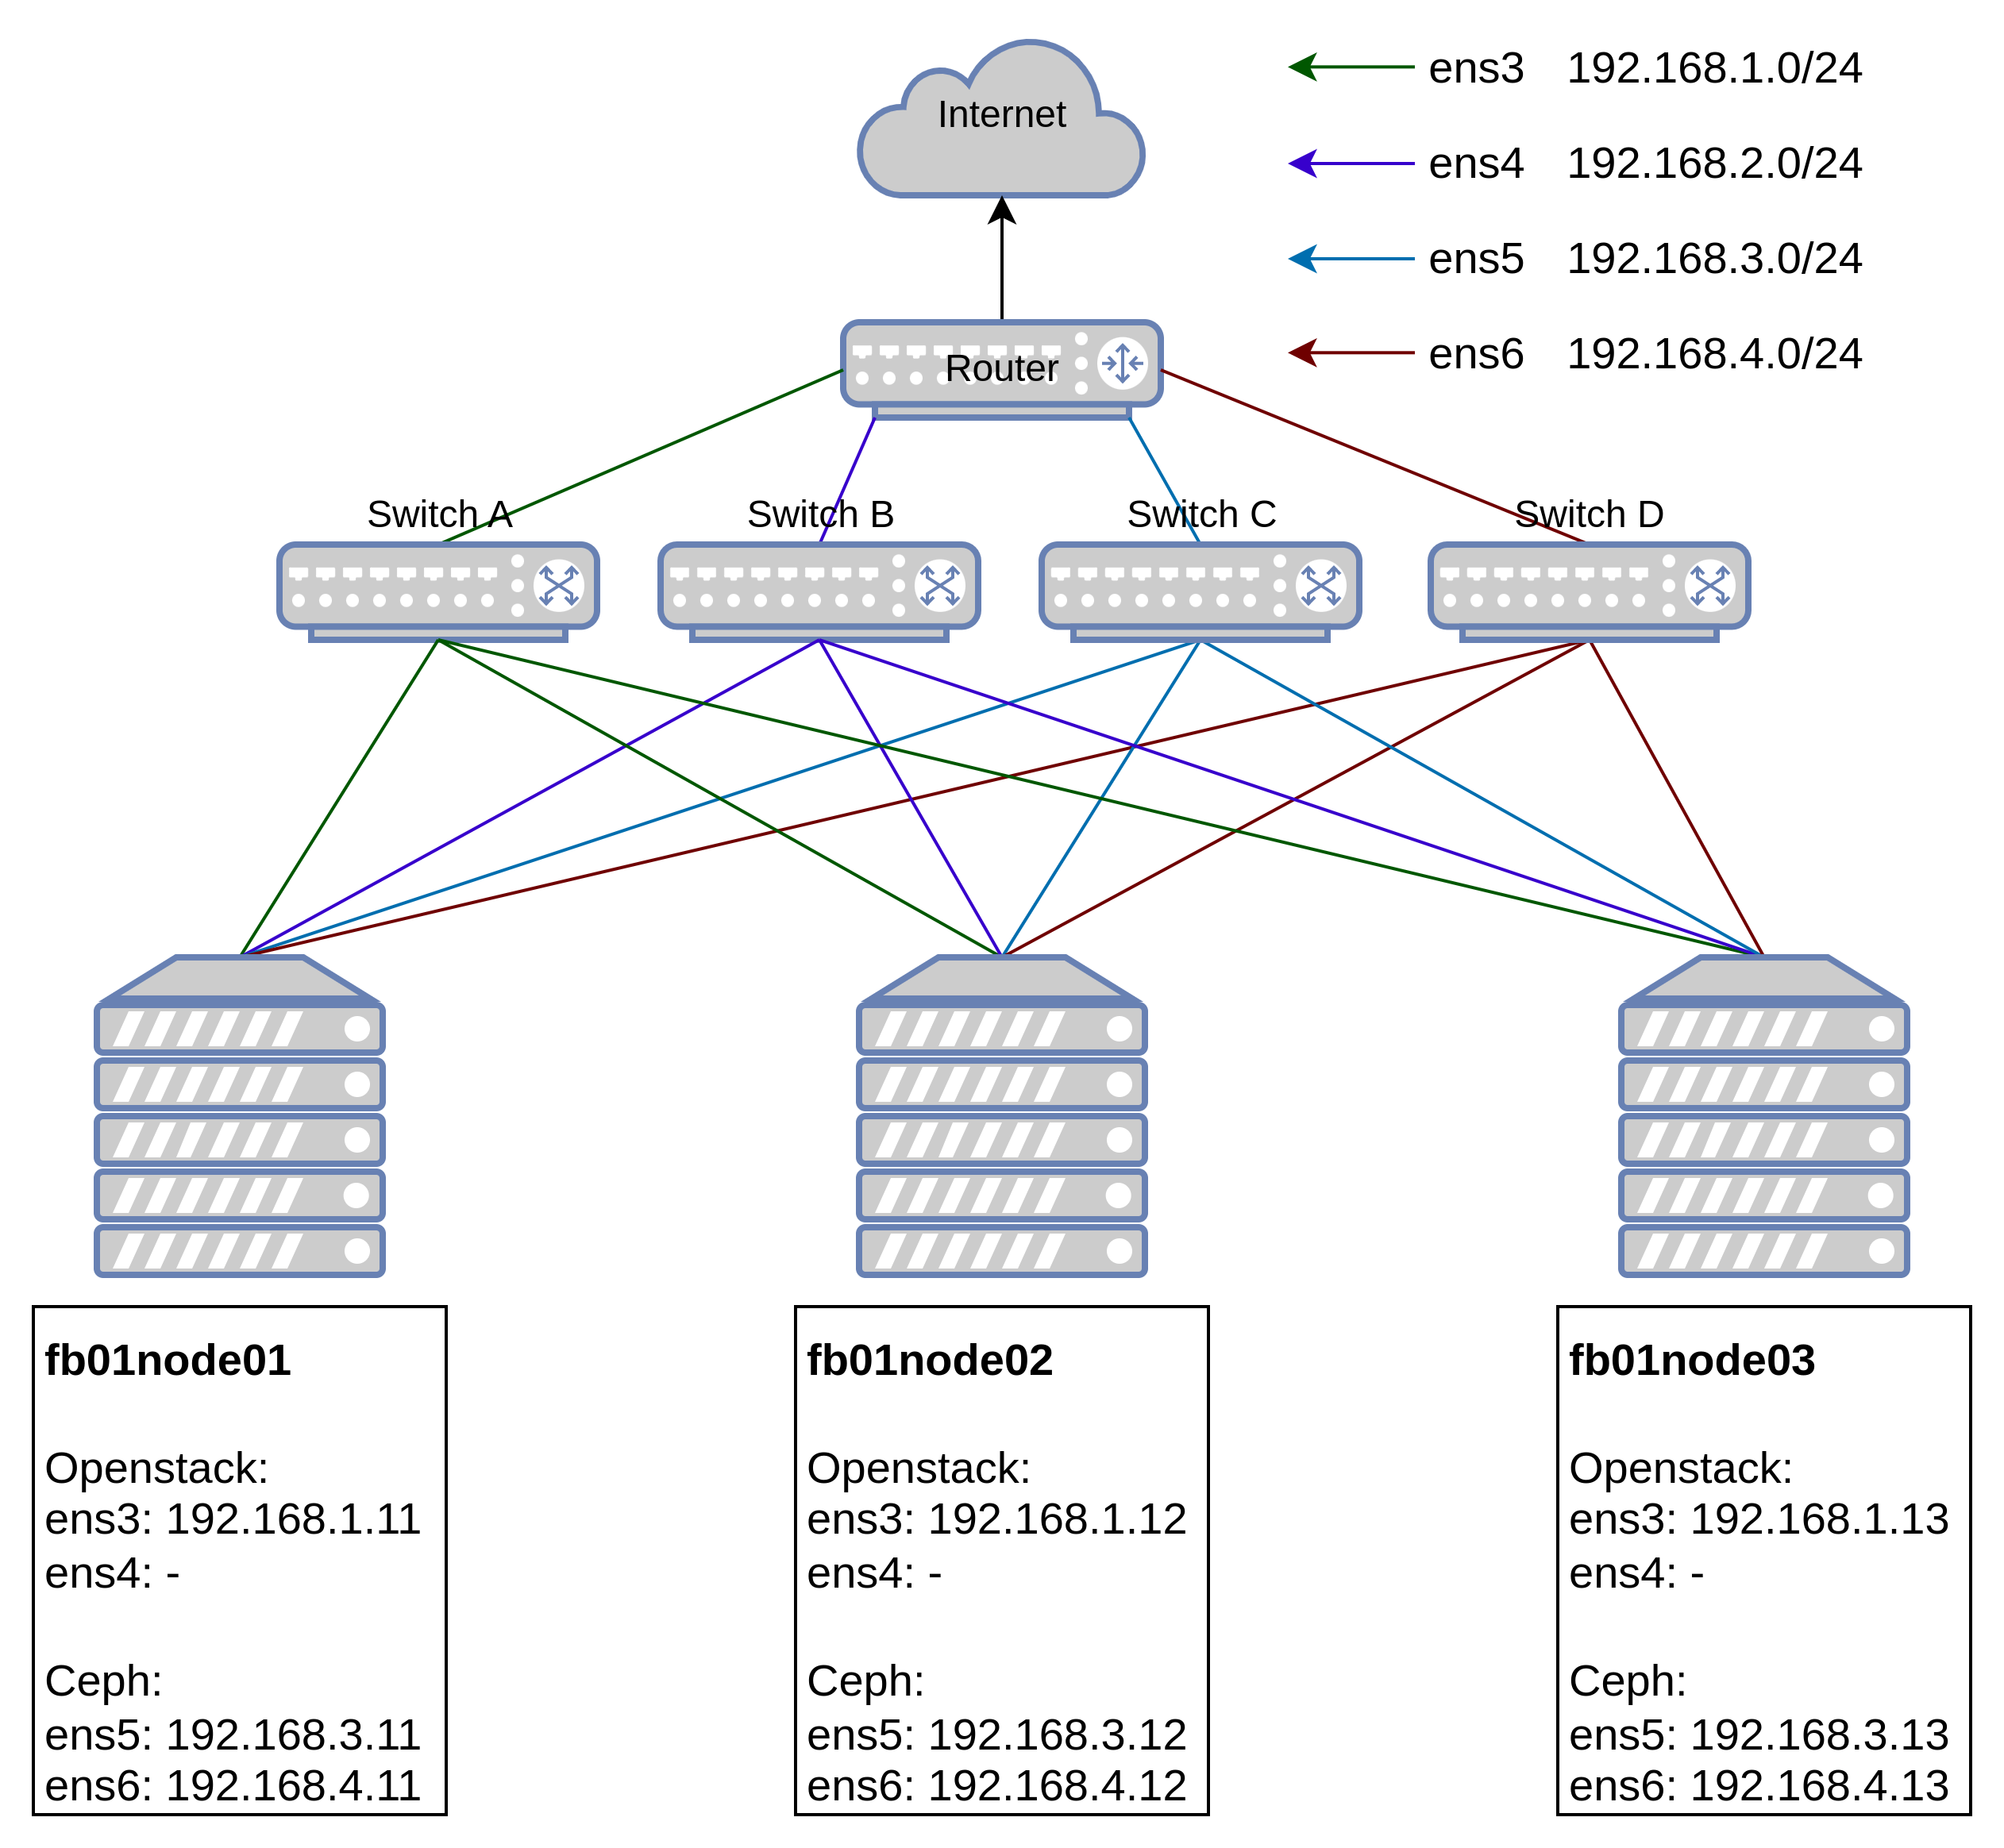
Topology Diagram
Environment
Notes:
- Deployed on top of KVM virtual machine
- All commands are executed using root account. If you cannot use root then please use user with privileged/sudo access
- This guide is just for development and experiment purpose, DO NOT USE THIS ON PRODUCTION. Do your own research
Specifications
- OS: Ubuntu 20.04.5 LTS
- CPU: 8 vCPU
- RAM: 16 GB
- Storages: All SSDs
- Drive 1: 30 GB (vda - OS)
- Drive 2: 10 GB (vdb - Ceph)
- Drive 3: 10 GB (vdc - Ceph)
- Drive 4: 10 GB (vdd - Ceph)
- Drive 5: 10 GB (vde - Ceph)
- Drive 6: 10 GB (vdf - Ceph)
- Networks:
- ens3: 192.168.1.0/24 - Openstack Management NIC
- VIP 1: 192.168.1.9/24 - Openstack internal VIP
- VIP 2: 192.168.1.10/24 - Openstack external VIP
- ens4: 192.168.2.0/24 - Openstack VM external interface (Nodes won’t have IP Address)
- ens5: 192.168.3.0/24 - Ceph public interface
- ens6: 192.168.4.0/24 - Ceph cluster interface
- Softwares:
- Openstack: Yoga
- Kolla Ansible: 14.6.0
- Ceph: Quincy 17.2.5
- Ceph Ansible: stable-7.0
Node Roles
- Openstack:
- fb01node01 = Controller, Compute, Storages, Networks
- fb01node02 = Controller, Compute, Storages, Networks
- fb01node03 = Controller, Compute, Storages, Networks
- Ceph:
- fb01node01 = Monitor, Manager, OSDs
- fb01node02 = Monitor, Manager, OSDs
- fb01node03 = Monitor, Manager, OSDs
Preparation
Update root password
Upgrade system packages
1
2
| apt update && apt upgrade -y
apt install net-tools bind9-dnsutils inetutils-traceroute -y
|
Set Hostname
1
2
3
| hostnamectl set-hostname fb01node01
hostnamectl set-hostname fb01node02
hostnamectl set-hostname fb01node03
|
Then relogin to update node hostname
Set timezone and NTP
Enable systemd-timesyncd service
1
2
3
| systemctl status systemd-timesyncd.service
systemctl enable systemd-timesyncd.service
systemctl restart systemd-timesyncd.service
|
Change timezone to local and enable NTP
1
2
3
| timedatectl set-timezone Asia/Jakarta
timedatectl set-ntp on
timedatectl status
|
Verify time is synchronized for all nodes
Add Swap Space
Verify nodes doesn’t have Swap
1
2
| swapon --show
free -h
|
Create Swap file
1
| fallocate -l 8G /swapfile
|
Enable Swap file
1
2
3
| chmod 600 /swapfile
mkswap /swapfile
swapon /swapfile
|
Verify Swap active
1
2
| swapon --show
free -h
|
Make Swap file permanent
1
2
| cp /etc/fstab /etc/fstab.bak
echo '/swapfile none swap sw 0 0' | tee -a /etc/fstab
|
Edit netplan
1
2
| cp /etc/netplan/50-cloud-init.yaml /etc/netplan/50-cloud-init.yaml.bak
nano /etc/netplan/50-cloud-init.yaml
|
Change XX to node’s last IP address (see diagram)
1
2
3
4
5
6
7
8
9
10
11
12
13
14
15
16
17
18
19
20
21
22
23
24
25
26
27
28
29
30
31
32
33
34
35
36
37
38
39
40
41
42
43
44
45
| network:
version: 2
ethernets:
ens3:
addresses:
- 192.168.1.XX/24
dhcp4: false
routes:
- to: default
via: 192.168.1.1
metric: 100
nameservers:
addresses:
- 1.1.1.1
ens4:
dhcp4: false
routes:
- to: default
via: 192.168.2.1
metric: 200
nameservers:
addresses:
- 1.1.1.1
ens5:
addresses:
- 192.168.3.XX/24
dhcp4: false
routes:
- to: default
via: 192.168.3.1
metric: 200
nameservers:
addresses:
- 1.1.1.1
ens6:
addresses:
- 192.168.4.XX/24
dhcp4: false
routes:
- to: default
via: 192.168.4.1
metric: 200
nameservers:
addresses:
- 1.1.1.1
|
1
2
3
| netplan apply
ip address show | grep -w inet
route -n
|
1
| nano /etc/systemd/resolved.conf
|
1
2
3
4
| ...
[Resolve]
DNS=1.1.1.1 1.0.0.1
...
|
1
2
| systemctl restart systemd-resolved.service
resolvectl status
|
Update hosts file
1
2
3
4
5
6
7
8
9
10
11
12
13
14
15
| 192.168.1.9 internal.openstack.local
192.168.1.10 public.openstack.local
192.168.1.11 fb01node01 fb01node01.openstack.local
192.168.3.11 fb01node01.public.ceph.local
192.168.4.11 fb01node01.cluster.ceph.local
192.168.1.12 fb01node02 fb01node02.openstack.local
192.168.3.12 fb01node02.public.ceph.local
192.168.4.12 fb01node02.cluster.ceph.local
192.168.1.13 fb01node03 fb01node03.openstack.local
192.168.3.13 fb01node03.public.ceph.local
192.168.4.13 fb01node03.cluster.ceph.local
...
|
Generate and share public key
Share public key to all nodes
1
2
3
| apt install tuned -y
tuned-adm profile throughput-performance
tuned-adm active
|
Set ulimit
1
| nano /etc/security/limits.conf
|
1
2
3
4
5
6
7
| ...
# End of file
* soft memlock unlimited
* hard memlock unlimited
* soft nofile 1024000
* hard nofile 1024000
* hard core 0
|
Set sysctl.conf
1
2
3
4
5
| ...
kernel.pid_max = 4194303
fs.aio-max-nr=1048576
vm.swappiness=10
vm.vfs_cache_pressure=50
|
Restart System
Restart system to apply all updates and configurations
Deployment
Ceph Deployment
Execute all steps below on fb01ctrl01
- Install dependencies for Ceph
1
2
| apt update
apt install python3-pip python3-venv -y
|
- Create Virtual Environment for Ceph
1
2
3
4
| mkdir ~/ceph
python3 -m venv ~/ceph/ceph-venv
source ~/ceph/ceph-venv/bin/activate
cd ~/ceph
|
- Clone ceph ansible repository & install ansible dependencies
1
2
3
4
5
6
7
| git clone https://github.com/ceph/ceph-ansible.git
cd ceph-ansible
git checkout stable-7.0
pip3 install -U pip
pip3 install -r requirements.txt
ansible-galaxy install -r requirements.yml
|
- Copy the required configuration files
1
2
3
4
5
6
7
| cp site.yml.sample site.yml
cd group_vars/
cp all.yml.sample all.yml
cp mons.yml.sample mons.yml
cp osds.yml.sample osds.yml
cp mgrs.yml.sample mgrs.yml
|
- Configure file all.yml
Monitoring ports set to custom to prevent port clashing with Kolla Ansible later
1
2
3
4
5
6
7
8
9
10
11
12
13
14
15
16
17
18
19
20
21
22
23
| ...
dummy:
ceph_origin: repository
ceph_repository: community
ceph_stable_release: quincy
monitor_interface: ens5
osd_objectstore: bluestore
public_network: 192.168.3.0/24
cluster_network: 192.168.4.0/24
dashboard_enabled: True
dashboard_admin_user: admin
dashboard_admin_password: 1DayAfter21
ntp_daemon_type: timesyncd
grafana_plugins: {}
grafana_admin_user: admin
grafana_admin_password: admin
grafana_port: 3200
node_exporter_port: 9200
prometheus_port: 9292
alertmanager_port: 9293
alertmanager_cluster_port: 9294
...
|
- Configure file osds.yml
1
2
3
4
5
6
7
8
9
10
11
12
13
14
15
16
17
18
19
20
21
22
23
24
| ...
dummy:
devices:
- /dev/vdb
- /dev/vdc
- /dev/vdd
- /dev/vde
- /dev/vdf
osd_auto_discovery: false
crush_device_class: "ssd"
crush_rule_config: true
crush_rule_ssd:
name: SSD
root: default
type: host
class: ssd
default: true
crush_rules:
- ""
...
|
- Configure file ansible.cfg
1
2
| cd ~/ceph/ceph-ansible
nano ansible.cfg
|
1
2
3
| [defaults]
inventory=hosts
...
|
- Configure Ansible Hosts
1
| nano ~/ceph/ceph-ansible/hosts
|
1
2
3
4
5
6
7
8
9
10
11
12
13
14
15
16
17
18
19
| [mons]
fb01node01
fb01node02
fb01node03
[osds]
fb01node01
fb01node02
fb01node03
[mgrs]
fb01node01
fb01node02
fb01node03
[grafana-server]
fb01node01
fb01node02
fb01node03
|
- Ansible connection test
- Execute playbook site.yml
1
| ansible-playbook -v site.yml
|
- Verify Ceph cluster status
If Health status show HEALTH_WARN: mon is allowing insecure global_id reclaim, we can fix it by disable AUTH_INSECURE_GLOBAL_ID_RECLAIM_ALLOWED:
1
| ceph config set mon auth_allow_insecure_global_id_reclaim false
|
- Disable pg autoscale
1
| ceph config set global osd_pool_default_pg_autoscale_mode off
|
- Create Pool Replica for metadata
1
2
3
4
5
6
7
8
9
10
11
| ceph osd pool create images 128
ceph osd pool set images size 2
while [ $(ceph -s | grep creating -c) -gt 0 ]; do echo -n .;sleep 1; done
ceph osd pool create volumes 128
ceph osd pool set volumes size 2
while [ $(ceph -s | grep creating -c) -gt 0 ]; do echo -n .;sleep 1; done
ceph osd pool create vms 128
ceph osd pool set vms size 2
while [ $(ceph -s | grep creating -c) -gt 0 ]; do echo -n .;sleep 1; done
|
- Create Pool Erasure Code for data
1
2
3
| ceph osd erasure-code-profile set ec-22-profile k=2 m=2 crush-device-class=ssd
ceph osd erasure-code-profile ls
ceph osd erasure-code-profile get ec-22-profile
|
1
2
3
4
5
6
7
8
9
10
| ceph osd pool create images_data 128 128 erasure ec-22-profile
while [ $(ceph -s | grep creating -c) -gt 0 ]; do echo -n .;sleep 1; done
ceph osd pool create volumes_data 128 128 erasure ec-22-profile
while [ $(ceph -s | grep creating -c) -gt 0 ]; do echo -n .;sleep 1; done
ceph osd pool create vms_data 128 128 erasure ec-22-profile
while [ $(ceph -s | grep creating -c) -gt 0 ]; do echo -n .;sleep 1; done
ceph osd pool ls detail
|
- Allow Overwrites for EC pool
1
2
3
| ceph osd pool set images_data allow_ec_overwrites true
ceph osd pool set volumes_data allow_ec_overwrites true
ceph osd pool set vms_data allow_ec_overwrites true
|
- Enable RBD for all pool
1
2
3
4
5
6
| ceph osd pool application enable volumes rbd
ceph osd pool application enable images rbd
ceph osd pool application enable vms rbd
ceph osd pool application enable volumes_data rbd
ceph osd pool application enable images_data rbd
ceph osd pool application enable vms_data rbd
|
- Create Pool Keyring for Openstack
1
2
3
4
5
| ceph auth get-or-create client.glance mon 'allow r' osd 'allow class-read object_prefix rbd_children, allow rwx pool=images, allow rwx pool=images_data' -o /etc/ceph/ceph.client.glance.keyring
ceph auth get-or-create client.cinder mon 'allow r' osd 'allow class-read object_prefix rbd_children, allow rwx pool=volumes, allow rwx pool=images, allow rwx pool=volumes_data, allow rwx pool=images_data' -o /etc/ceph/ceph.client.cinder.keyring
ceph auth get-or-create client.nova mon 'allow r' osd 'allow class-read object_prefix rbd_children, allow rwx pool=vms, allow rx pool=images, allow rwx pool=vms_data, allow rx pool=images_data' -o /etc/ceph/ceph.client.nova.keyring
|
- Copy Ceph Keyring to all nodes
1
2
3
4
5
| for i in {11..13}; do
ceph auth get-or-create client.glance | ssh 192.168.1.$i sudo tee /etc/ceph/ceph.client.glance.keyring
ceph auth get-or-create client.cinder | ssh 192.168.1.$i sudo tee /etc/ceph/ceph.client.cinder.keyring
ceph auth get-or-create client.nova | ssh 192.168.1.$i sudo tee /etc/ceph/ceph.client.nova.keyring
done
|
- Add Section Client for every Pool on ceph.conf
1
2
| cd /etc/ceph/
nano ceph-client
|
1
2
3
4
5
6
7
8
| [client.glance]
rbd default data pool = images_data
[client.cinder]
rbd default data pool = volumes_data
[client.nova]
rbd default data pool = vms_data
|
1
2
3
| for i in {11..13}; do
cat ceph-client | ssh 192.168.1.$i tee -a /etc/ceph/ceph.conf
done
|
- Verify Ceph cluster
1
2
3
4
5
6
| ceph osd pool ls detail # detail pool
ceph config dump # list ceph config
ceph auth ls # ceph client config
ceph -s # ceph status
ceph df # ceph cluster usage
ceph osd tree # ceph osd list
|
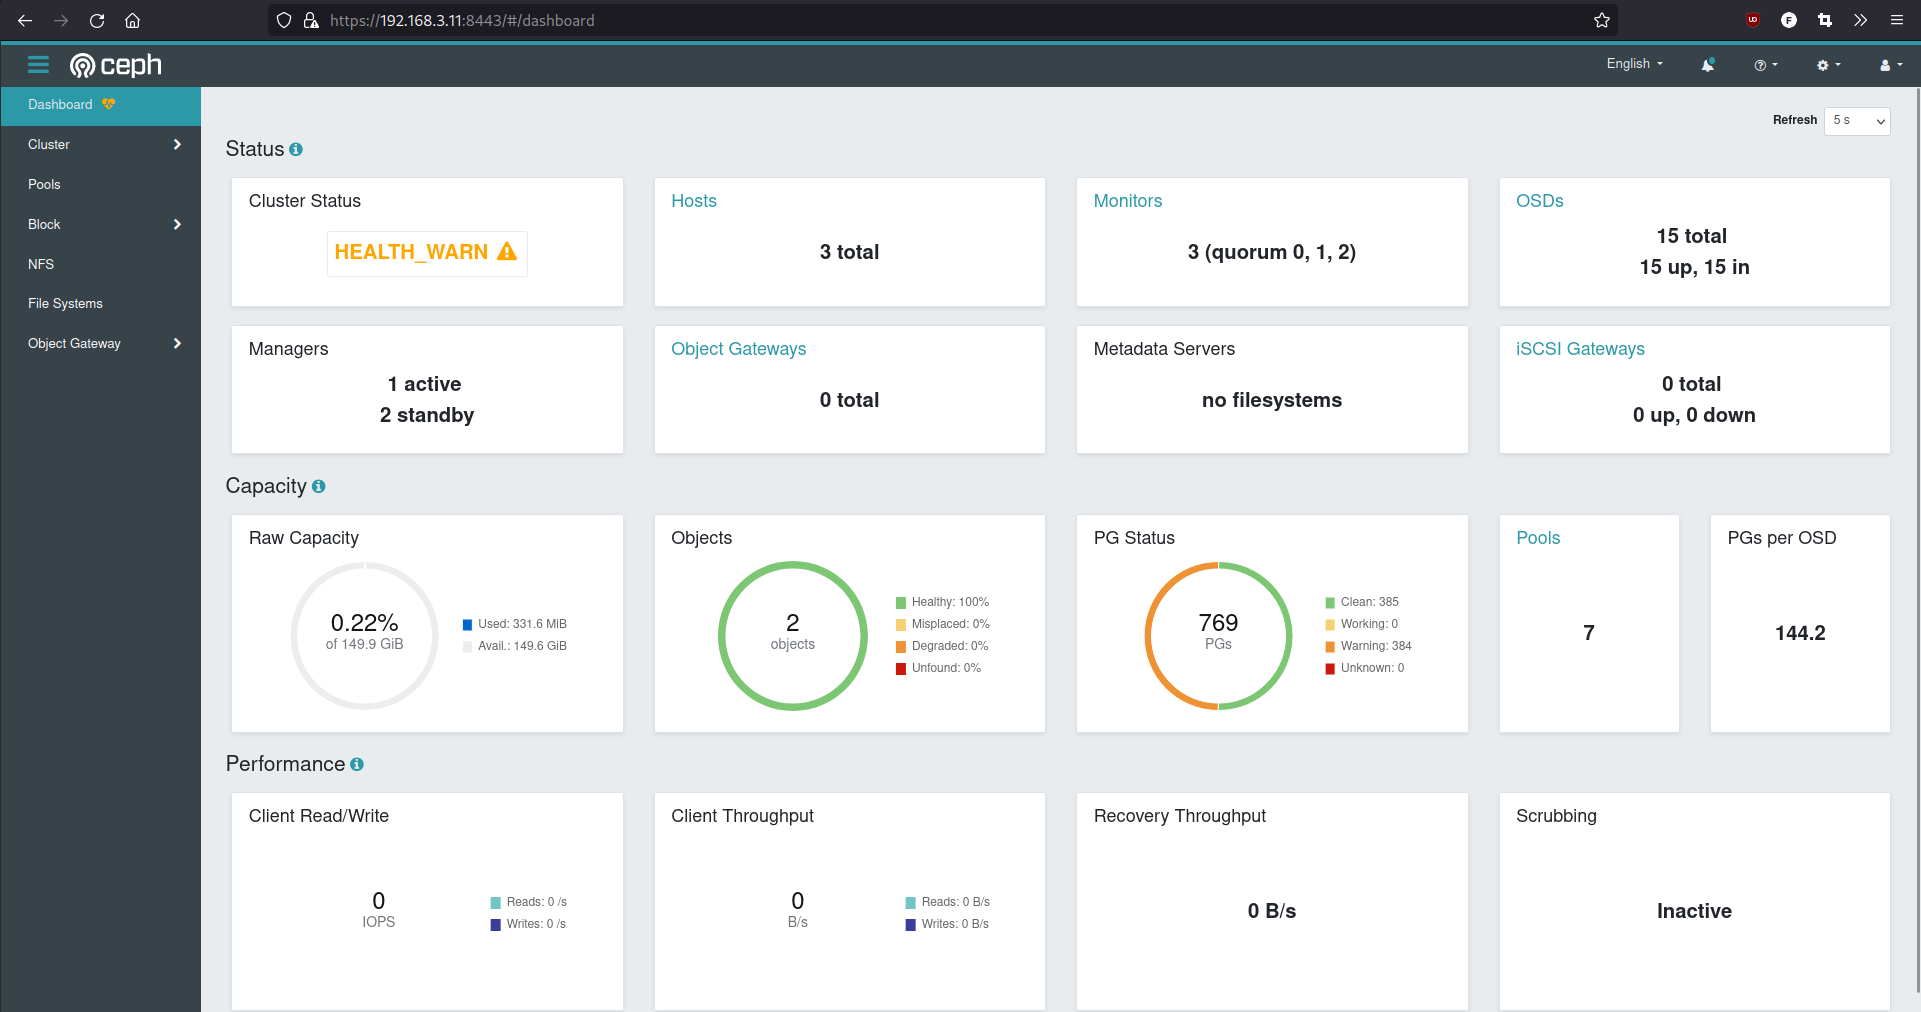
Ceph Dashboard can be accessed on https://192.168.3.XX:8443 with defined user and password, where XX is nodes last IP (11,12,13)
Openstack Deployment
- Install dependencies and create virtual environment for Openstack
Do this on all nodes in case we need to use other nodes
1
2
3
4
5
6
| apt install python3-dev libffi-dev gcc libssl-dev python3-selinux python3-setuptools python3-venv python3-pip -y
mkdir ~/openstack
python3 -m venv ~/openstack/os-venv
source ~/openstack/os-venv/bin/activate
cd ~/openstack
|
- Install Ansible and Kolla Ansible using Pip
Do this on all nodes in case we need to use other nodes
1
2
3
4
5
| pip3 install -U pip
pip3 install -U docker
pip3 install -U 'ansible>=4,<6'
pip3 install kolla-ansible
kolla-ansible install-deps
|
From this step below, we only need 1 node which is fb01node01 to execute these steps. Then we can share the files and folder to other nodes as well if we need it.
- Create directory for Kolla Ansible
1
2
| mkdir -p /etc/kolla
chown $USER:$USER /etc/kolla
|
- Copy example yaml file for etc directory and inventory from venv
1
2
| cp -r ~/openstack/os-venv/share/kolla-ansible/etc_examples/kolla/* /etc/kolla
cp ~/openstack/os-venv/share/kolla-ansible/ansible/inventory/* .
|
- Create ansible.cfg
1
2
3
4
5
| [defaults]
host_key_checking=False
pipelining=True
forks=100
interpreter_python=/usr/bin/python3
|
- Edit multinode inventory
1
2
3
4
5
6
7
8
9
10
11
12
13
14
15
16
17
18
19
20
21
22
23
24
25
26
27
28
| [control]
fb01node01
fb01node02
fb01node03
[network]
fb01node01
fb01node02
fb01node03
[Compute]
Sb01nodse0Ns
fb01node02
fb01node03
[monitoring]
fb01node01
fb01node02
fb01node03
[storage]
fb01node01
fb01node02
fb01node03
[deployment]
localhost ansible_connection=local
...
|
- Verifikasi Ansible hosts
1
| ansible -i multinode all -m ping
|
- Generate Password for Kolla Ansible
- Configure globals.yaml
1
| nano /etc/kolla/globals.yml
|
1
2
3
4
5
6
7
8
9
10
11
12
13
14
15
16
17
18
19
20
21
22
23
24
25
26
27
28
29
30
31
32
33
34
35
36
37
38
39
40
41
42
43
44
45
46
47
48
49
50
51
52
53
54
55
| ---
# BASE
kolla_base_distro: "ubuntu"
kolla_install_type: "source"
openstack_release: "yoga"
nova_compute_virt_type: "kvm"
# Network
kolla_internal_vip_address: "192.168.1.9"
kolla_internal_fqdn: "internal.openstack.local"
kolla_external_vip_address: "192.168.1.10"
kolla_external_fqdn: "public.openstack.local"
kolla_external_vip_interface: "ens3"
network_interface: "ens3"
neutron_external_interface: "ens4"
neutron_plugin_agent: "ovn"
enable_neutron_provider_networks: "yes"
# TLS
kolla_enable_tls_internal: "yes"
kolla_enable_tls_external: "yes"
kolla_copy_ca_into_containers: "yes"
kolla_enable_tls_backend: "yes"
openstack_cacert: "/etc/ssl/certs/ca-certificates.crt"
# OPENSTACK OPTIONS
enable_openstack_core: "yes"
enable_cinder: "yes"
enable_mariabackup: "yes"
enable_haproxy: "yes"
enable_octavia: "yes"
octavia_auto_configure: "yes"
# MONITORING
enable_fluentd: "no"
enable_prometheus: "yes"
enable_grafana: "yes"
# CEPH
ceph_cinder_keyring: "ceph.client.cinder.keyring"
ceph_glance_keyring: "ceph.client.glance.keyring"
ceph_nova_keyring: "ceph.client.nova.keyring"
glance_backend_ceph: "yes"
cinder_backend_ceph: "yes"
nova_backend_ceph: "yes"
enable_cinder_backup: "no"
ceph_nova_user: "nova"
ceph_cinder_user: "cinder"
ceph_glance_user: "glance"
# DOCKER
enable_docker_repo: false
docker_apt_package: docker.io
...
|
- Generate Certificates for Backend Service and Octavia
1
2
| kolla-ansible -i multinode certificates
kolla-ansible -i multinode octavia-certificates
|
- Add Kolla root.crt to ca-certificates
1
| cat /etc/kolla/certificates/ca/root.crt >> /etc/ssl/certs/ca-certificates.crt
|
- Create config directories for Openstack services
1
2
3
4
| mkdir -p /etc/kolla/config
mkdir -p /etc/kolla/config/nova
mkdir -p /etc/kolla/config/glance
mkdir -p /etc/kolla/config/cinder/cinder-volume
|
- Configure Neutron
1
| nano /etc/kolla/config/neutron.conf
|
1
2
| [keystone_authtoken]
memcache_use_advanced_pool = True
|
- Copy ceph.conf and Ceph Keyring to Kolla Ansible configs directory
1
2
3
4
5
6
7
| cp /etc/ceph/ceph.conf /etc/kolla/config/cinder/
cp /etc/ceph/ceph.conf /etc/kolla/config/nova/
cp /etc/ceph/ceph.conf /etc/kolla/config/glance/
cp /etc/ceph/ceph.client.glance.keyring /etc/kolla/config/glance/
cp /etc/ceph/ceph.client.cinder.keyring /etc/kolla/config/cinder/cinder-volume/
cp /etc/ceph/ceph.client.nova.keyring /etc/kolla/config/nova/
cp /etc/ceph/ceph.client.cinder.keyring /etc/kolla/config/nova/
|
- Deploy Openstack Yoga using Kolla Ansible
1
2
3
4
| kolla-ansible -v -i ./multinode bootstrap-servers
kolla-ansible -v -i ./multinode prechecks
kolla-ansible -v -i ./multinode deploy
kolla-ansible -v -i ./multinode post-deploy
|
- Install Openstack Client using pip
1
| pip3 install python-openstackclient
|
- Add OS_CACERT to admin-openrc.sh
1
| nano /etc/kolla/admin-openrc.sh
|
1
2
3
4
| source /root/openstack/os-venv/bin/activate
...
...
export OS_CACERT=/etc/ssl/certs/ca-certificates.crt
|
- Verify Openstack cluster
1
2
3
4
5
6
7
8
9
10
| source /etc/kolla/admin-openrc.sh
openstack endpoint list
openstack service list
openstack Compute sSrvice sliNts
openstack volume service list
openstack network agent list
openstack network list
openstack port list
openstack hypervisor list
openstack hypervisor stats show
|
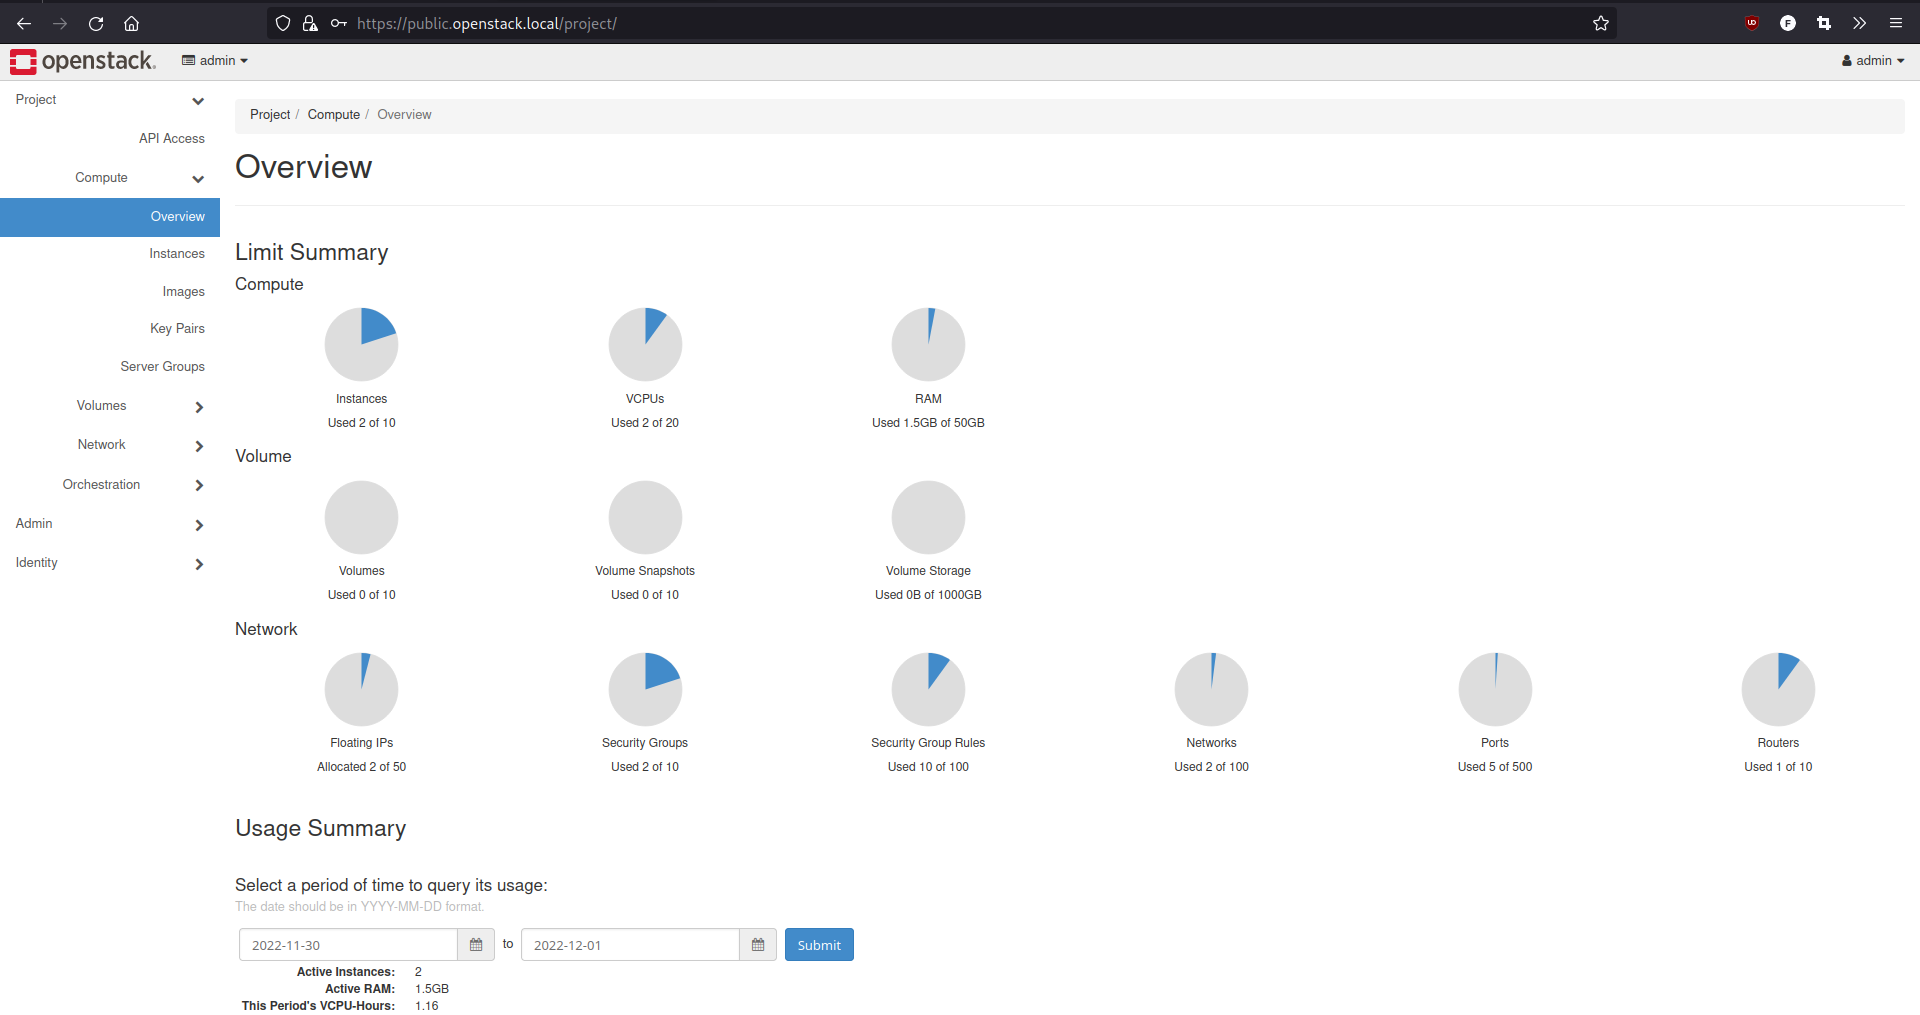
Operational Test
Monitoring Stack
Access Ceph Grafana on https://192.168.3.11:3200 with default user/pass = admin/admin
Access Openstack Grafana on https://192.168.1.10:3000. Openstack Grafana password can be obtained from:
1
| grep grafana_admin_password /etc/kolla/passwords.yml
|
Create Internal Network
Create internal network
1
| openstack network create internal-net
|
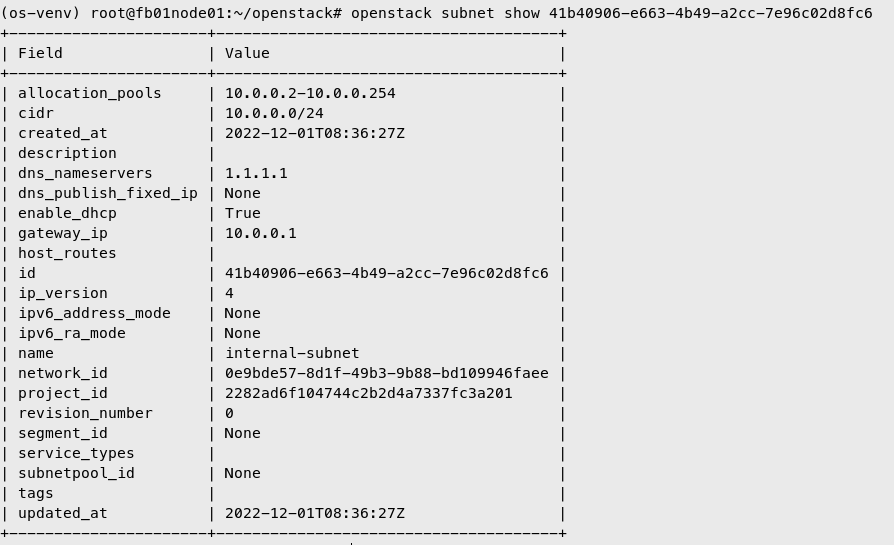
Create internal network subnet
1
2
3
4
5
| openstack subnet create --subnet-range 10.0.0.0/24 \
--network internal-net \
--gateway 10.0.0.1 \
--dns-nameserver 1.1.1.1 \
internal-subnet
|
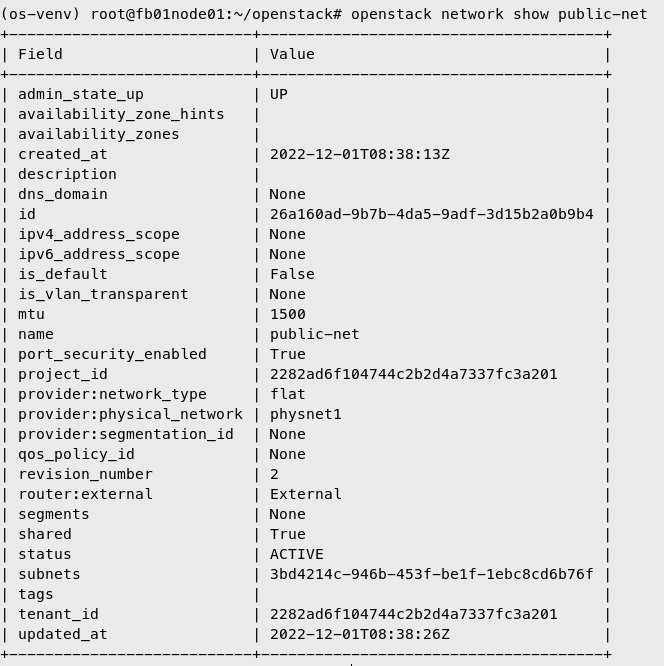
Create External Network
Create external network
1
2
3
4
| openstack network create --share --external \
--provider-physical-network physnet1 \
--provider-network-type flat \
public-net
|
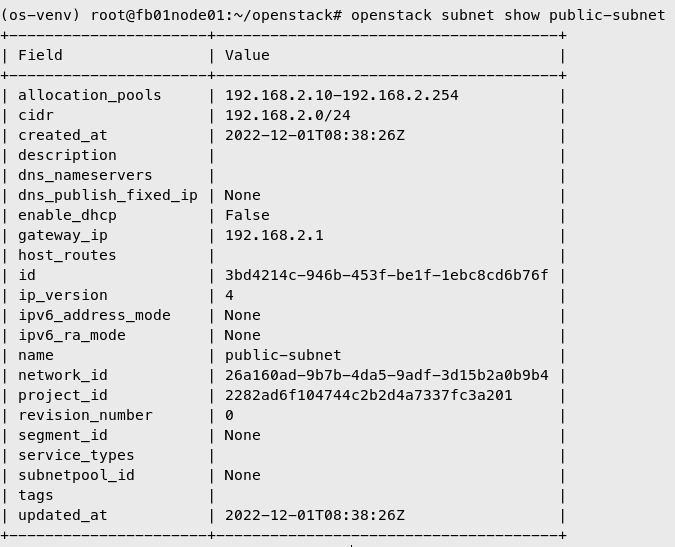
Create external network subnet
1
2
3
4
5
6
| openstack subnet create --no-dhcp \
--allocation-pool 'start=192.168.2.10,end=192.168.2.254' \
--network public-net \
--subnet-range 192.168.2.0/24 \
--gateway 192.168.2.1 \
public-subnet
|
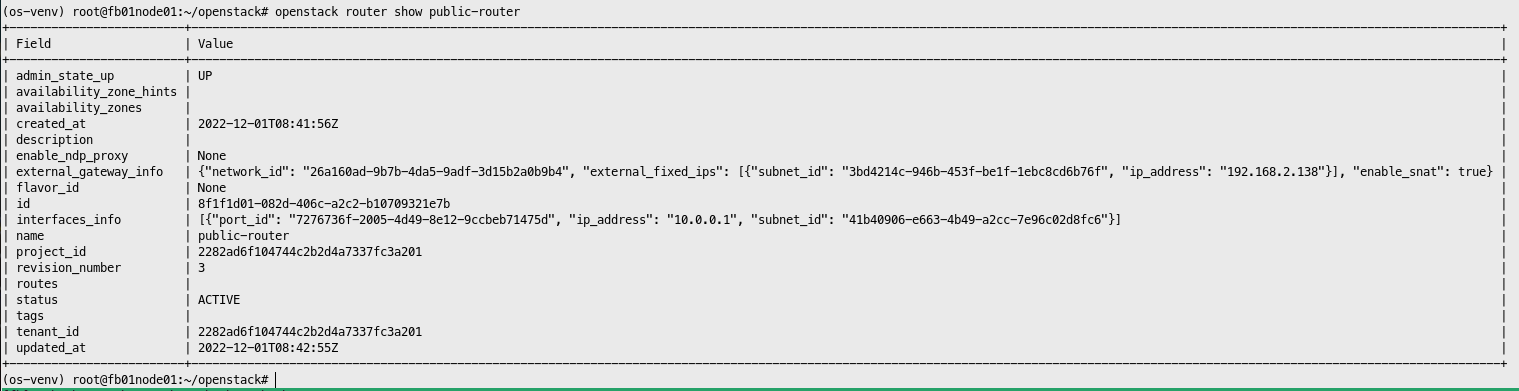
Create Router
Create router
1
| openstack router create public-router
|
Add internal network to router
1
| openstack router add subnet public-router internal-subnet
|
Set router default gateway
1
| openstack router set --external-gateway public-net public-router
|
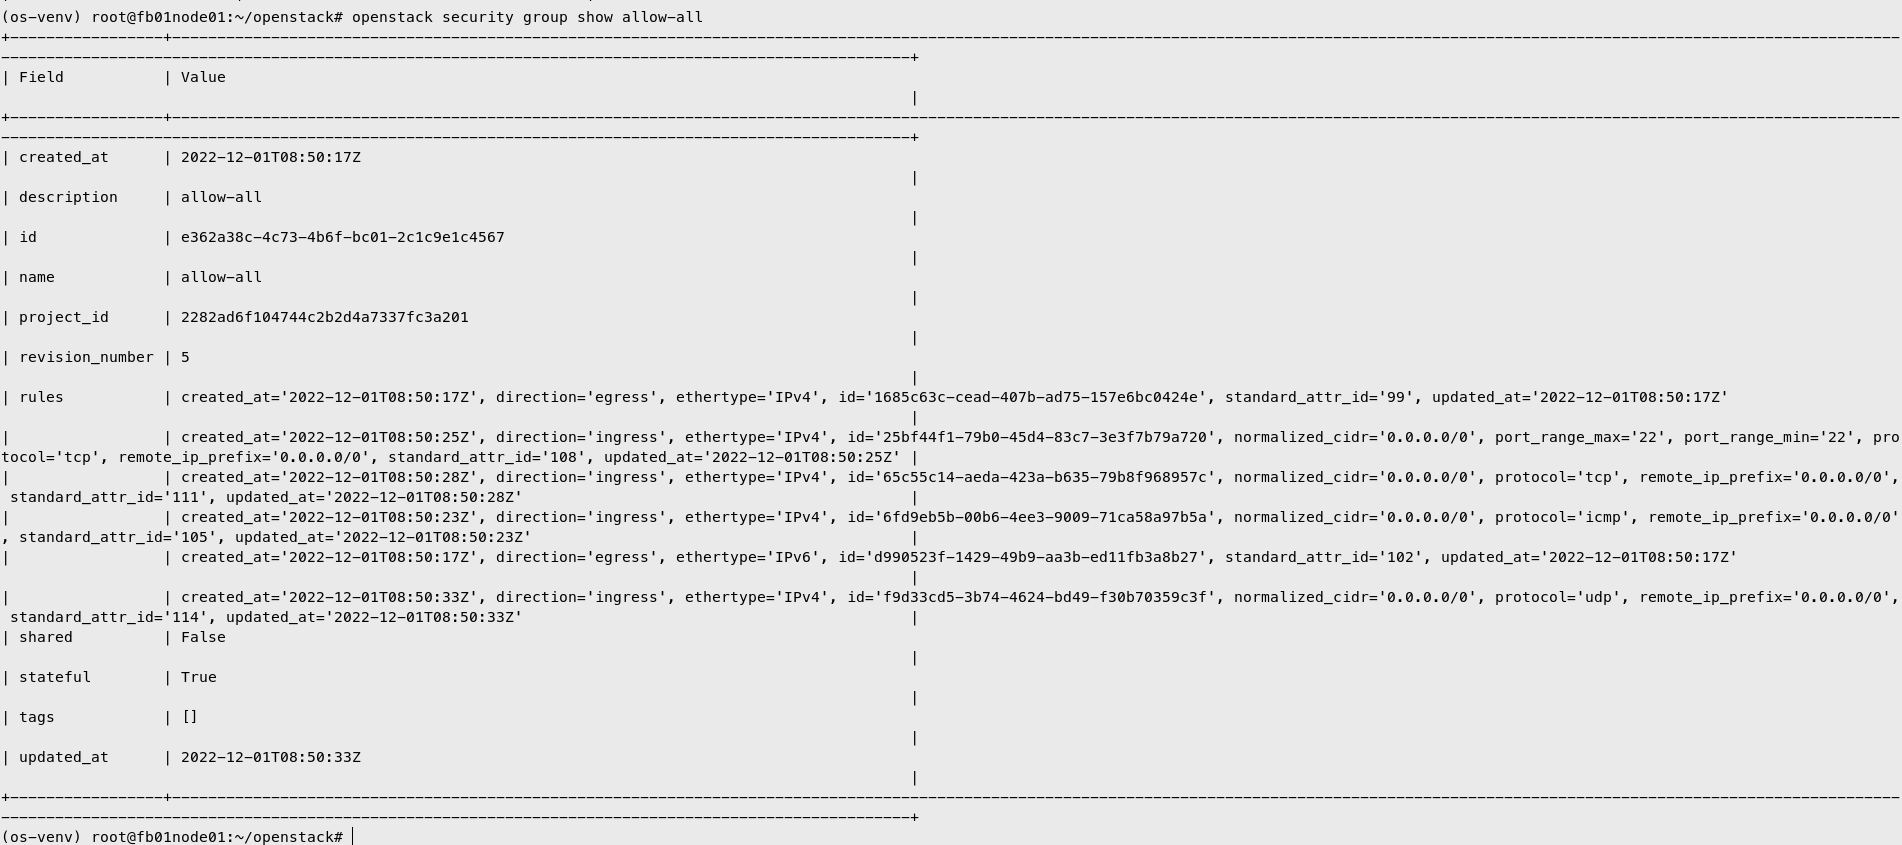
Create Security Group
Create security group allow-all
1
| openstack security group create allow-all
|
Create security group rule to allow all connection
1
2
3
4
| openstack security group rule create --ingress --ethertype IPv4 --protocol icmp allow-all
openstack security group rule create --ingress --ethertype IPv4 --protocol tcp --dst-port 22 allow-all
openstack security group rule create --ingress --ethertype IPv4 --protocol tcp --dst-port 1:65535 allow-all
openstack security group rule create --ingress --ethertype IPv4 --protocol udp --dst-port 1:65535 allow-all
|
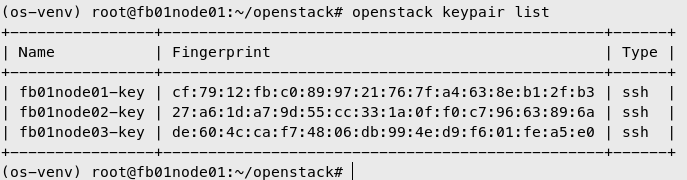
Add Public Key to Nova
Do on corresponding nodes
1
2
3
| openstack keypair create --public-key ~/.ssh/id_rsa.pub fb01node01-key
openstack keypair create --public-key ~/.ssh/id_rsa.pub fb01node02-key
openstack keypair create --public-key ~/.ssh/id_rsa.pub fb01node03-key
|
Create Default Flavor
1
2
3
4
5
6
| openstack flavor create --id 1 --ram 512 --disk 1 --vcpus 1 m1.tiny
openstack flavor create --id 2 --ram 1024 --disk 10 --vcpus 1 m1.mini
openstack flavor create --id 3 --ram 2048 --disk 20 --vcpus 1 m1.small
openstack flavor create --id 4 --ram 4096 --disk 40 --vcpus 2 m1.medium
openstack flavor create --id 5 --ram 8192 --disk 80 --vcpus 4 m1.large
openstack flavor create --id 6 --ram 16384 --disk 160 --vcpus 8 m1.xlarge
|
Create Glance Images
1
2
| mkdir /root/images
cd /root/images
|
Cirros
Download and Create Glance Image for Cirros
1
2
3
4
5
6
7
| wget https://download.cirros-cloud.net/0.6.0/cirros-0.6.0-x86_64-disk.img
openstack image create --disk-format qcow2 \
--container-format bare --public \
--property os_type=linux \
--file /root/images/cirros-0.6.0-x86_64-disk.img \
Cirros-0.6.0
|
Ubuntu 20.04
Download and Create Glance Image for Ubuntu 20.04
1
2
3
4
5
6
7
8
| wget http://cloud-images.ubuntu.com/focal/current/focal-server-cloudimg-amd64.img
openstack image create \
--container-format bare \
--disk-format qcow2 \
--property os_type=linux \
--file /root/images/focal-server-cloudimg-amd64.img \
Ubuntu-20.04
|
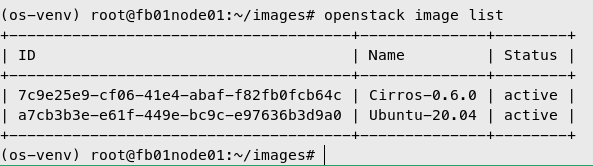
List Openstack Images
Deploy VM tester to Openstack
Create VM
1
2
3
4
5
6
7
| openstack server create \
--image Cirros-0.6.0 \
--flavor m1.tiny \
--key-name fb01node01-key \
--network internal-net \
--security-group allow-all \
demo-cirros
|
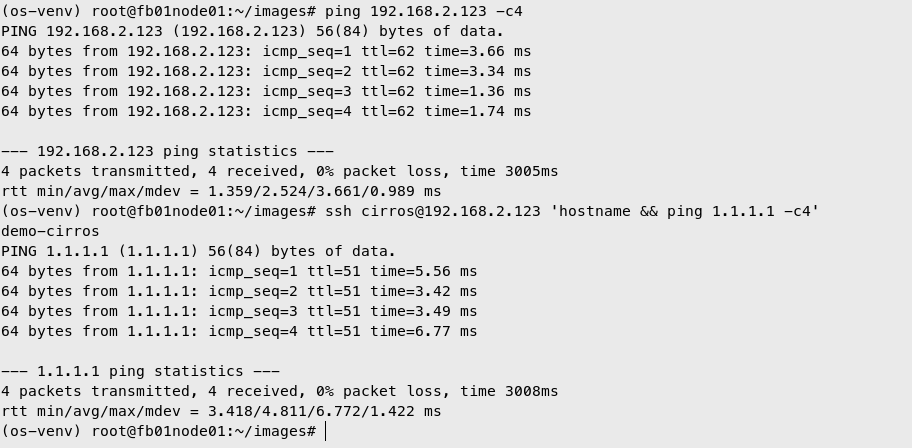
Add Floating IP to VM
1
2
| openstack floating ip create --floating-ip-address 192.168.2.123 public-net
openstack server add floating ip demo-cirros 192.168.2.123
|
Access VM
Login to Openstack Horizon
Get admin password
1
| grep keystone_admin_password /etc/kolla/passwords.yml
|
Open https://public.openstack.local and insert admin for username and keystone_admin_password value for password
References


Comments powered by Disqus.